OSCEs or Objective Structured Clinical Exams are the ‘practical’ exam of medical school. It aims to prepare you for the clinical and communication aspects of becoming a doctor. They can seem really difficult and stressful, but with enough practice, you are likely to score well. I hope these tips are helpful and make you feel a little less worried!
What do you need to know?
It seems obvious, but make sure you know which examinations, histories and procedures you’re expected to know and what you’re supposed to be doing in them. Check out our OSCE guides if you’re looking for help.
Practice makes perfect
Grab a fellow medic/friend/flatmate and practice regularly until your examinations are fluent and confident. Exam nervousness can affect your performance, so it’s better to be a bit overprepared than under. If your medical school allows you to practice with their equipment, then take advantage of those opportunities. If not, things like reflex hammers, blood pressure cuffs and penlights can be bought off the internet for a decent price. Remember to practice with a timer too as the minutes fly by in the real thing.
Clothes maketh the man
Dress professionally and accordingly to NHS dress code. Looking neat might not give you extra marks, but it does help you make a good first impression. Remember to tie up long hair, roll sleeves up above the elbows and take off your wristwatch.
Devil’s in the detail
Read the instructions carefully before you enter the station. It sounds silly, but people have been known to do the wrong examination in OSCEs (e.g. upper limb instead of lower limb neurological examination). If you don’t do what you’ve been asked, you just won’t get the marks.
Did you wash them?
Always begin and end a station with washing your hands! Not only is it just good clinical practice, this gives you vital and easy marks.
And so it begins…
Memorise your opening patter until it becomes second nature. This should consist of greeting the patient, introducing yourself, checking their identity, describing the procedure/examination and gaining their permission to continue. Easy marks, but important stuff.
Structure is everything
For examinations, develop an order that you are comfortable with and can remember. For details check out our OSCE clinical skills guides.
For history taking, a general structure applies:
Presenting complaint
History of presenting complaint
Past medical history
Drug history
Family history
Social history
Systemic enquiry
This may change during a consultation as patients don’t necessarily follow your rules – but having a structure in place makes it easier to keep track of what you have and haven’t asked and helps you with the flow of questioning.
You may not be feeling very confident during your OSCE, but pretend you are! Stand up straight, smile when appropriate and speak loudly and clearly – being too apprehensive can give the impression you don’t really know what you’re doing and make the patient nervous too.
Manners cost nothing
Always be polite, empathetic and honest to your patient. Listen to them carefully and let them speak. Thank them and the examiner at the end of the station. After all, they’ve given up their free time to help you. A significant amount of marks are often awarded just for demonstrating these generic communication skills, so don’t neglect them!
Keep calm and carry on
Don’t worry about making mistakes during the OSCE – you haven’t got time to panic. Stay calm, take a deep breath and continue as you were.
Think again
Once you finish your examination you may have some spare time; don’t let this go to waste. Look around to see if there’s any equipment in the room you’ve not used.
If you remember something you’ve missed, then feel free to go back and do it – you’ve only got marks to gain.
Don’t waste a good mistake…
It can be easy to just wipe all memories of a bad OSCE out of your brain. However, if you write those errors down you can review them for your next exam and ensure you don’t make the same mistakes again. Talking to your coursemates about their experience can help too – no one said that you can only learn from your own mistakes.
Peripheral venous examination (varicose vein examination) frequently appears in OSCEs. You’ll be expected to pick up the relevant clinical signs of venous disease using your examination skills. This venous examination OSCE guide provides a clear step-by-step approach to examining the venous system. Check out our varicose vein examination mark scheme here.
Confirm patient details: Name and date of birth (DOB)
Explain the procedure:
“I would like to examine the veins in your legs today.”
“This will involve me looking at your legs whilst standing, feeling the veins and performing some other tests. You’ll need to take your trousers off to allow me to see and examine the legs, however, you’ll be keeping your underwear on.”
“Are you in any pain at the moment? Do you have any trouble standing?”
Check the patient’s understanding:“Do you understand everything I’ve mentioned? Do you have any questions?”
Gain consent and offer a chaperone:“Are you happy for me to continue with the examination? Would having another member of staff present, make you more comfortable during the examination?”
Expose the patient from the waist downwards (keeping their underwear on)
Check if the patient has any pain before you begin
General inspection
Do the patient look comfortable?
Do they appear clinically unstable? (e.g. shortness of breath)
Look around the bed for clues (e.g. medication, compression stockings)
[ps2id id=’1′ target=”/]
Leg inspection
1. With the patient standing (if able) look for signs of venous disease from the front, side and back of the legs.
Things to look for
Surgical scars
Surgical scars are important to recognise, as this may be relevant to the patient’s presentation. It is worth clarifying what operation the patient had by checking the medical records and asking the patient.
Venous eczema
Venous eczema occurs as a result of venous hypertension causing fluid to collect in the tissues. The stasis of this fluid in the soft tissues results in activation of the innate immune response and subsequent inflammation.
Venous eczema has the following clinical characteristics:
Itchy red, blistered and crusted plaques; or dry fissured and scalyplaques on one or both lower legs (commonly mistaken for cellulitis)
Atrophie blanche (white irregular scars surrounded by red spots)
Orange-brown patches pigmentation due to haemosiderin deposition
Lipodermatosclerosis (as below)
Lipodermatosclerosis
Lipodermatosclerosis is a form of panniculitis (inflammation of the subcutaneous fat), caused by ongoing activation of the innate immune response in soft tissues (secondary to venous hypertension).
Lipodermatosclerosis has the following clinical characteristics:
Skin hardening (often called induration)
Hyperpigmentation
Erythema
Swelling
“Inverted champagne bottle” appearance
Venous ulcers
Venous ulcers are wounds that are thought to occur due to improper functioning of venous valves. They are the major cause of chronic wounds. Venous ulcers typically develop along the medial distal leg.
Venous ulcers present with the following clinical characteristics:
Large, irregular border with sloping edges
Shallow in depth
Often located over the medial aspect of the ankle (referred to as the gaiter region)
Associated with mild pain
Arterial ulcers, on the other hand, appear as smaller, deep, punched out, well-defined and very painful areas
Saphena Varix
A Saphena Varix is a dilation of the saphenous vein at its junction with the femoral vein in the groin. It appears as a swelling around 2-4cm inferior-lateral to the pubic tubercle. It typically has a bluish tinge, which can help differentiate it from an inguinal hernia.
Arterial disease
Arterial disease is important to be aware of when assessing and treating problems of the venous system. One of the common treatment options for varicose veins is compression therapy (with compression stockings). If a patient has a significant degree of arterial disease (assessed by calculating the ankle-brachial pressure index or ABPI) then they may not be suitable for compression therapy due to the risk of secondary ischaemia.
Clinical signs of arterial disease include:
Hair loss
Pallor
Cool temperature
Arterial ulcers: deep, punched out, well-defined and very painful ulcers
Varicose veins
Varicose veins appear as tortuous dilated superficial veins with a blue tinge.
The area of the varicose vein can help inform you as to which part of the venous system is affected:
The great saphenous vein originates at the merging of the dorsal vein of the big toe with the dorsal venous arch of the foot. After passing in front of the medial malleolus (where it often can be visualized and palpated), it runs up the medial side of the leg. At the knee, it runs over the posterior border of the medial epicondyle of the femur bone. In the proximal anterior thigh 3-4 centimetres inferolateral to the pubic tubercle, the great saphenous vein dives down deep through the cribriform fascia of the saphenous opening to join the femoral vein. ¹
The small saphenous vein originates at the merging of the dorsal vein of the fifth digit with the dorsal venous arch of the foot. From its origin, it courses around the lateral aspect of the foot (inferior and posterior to the lateral malleolus) and runs along the posterior aspect of the leg, where it passes between the heads of the gastrocnemius muscle. The small saphenous vein drains into the popliteal vein, at or above the level of the knee joint. ²
In summary, the long saphenous vein runs all the way up the medialside of the leg and the shortsaphenousvein drains the lateralside of the lowerleg.
Varicose veins on the buttocks and around the genitals suggest problems of the venous system within the pelvis.
[ps2id id=’2′ target=”/]
Palpation
1.Assess the temperature of any varicosities:
Place the back of your hand along varicosities to assess the temperature
Increased temperature can indicate inflammation and infection (e.g. phlebitis)
2.Palpate any visible varicosities:
Ask the patient to let you know if they experience any pain
Palpate the entire length of the varicosity
If there is overlying erythema in the distribution of the vessel and it is tender on palpation, this is suggestive of phlebitis
If the vessel feels hard (often referred to as “cord-like”) and pain is reported, this is strongly suggestive of thrombophlebitis (thrombosis with associated inflammation)
3. Assess the rate of venous emptying:
Elevate the limb to approximately 15º (with the patient flat on the bed) and assess the rate of venous emptying.
If there is obstruction of venous return (e.g. secondary to malignant compression), the rate of venous return will be prolonged.
4. Assess for pitting oedema in the limb:
Apply some pressure with a fingertip above the medial malleolus for a few seconds and then remove to see if an indentation has been left behind (e.g. pitting oedema).
Continue to move upwards along the leg, repeating this process until you establish at what level oedema extends to.
Pitting oedema is commonly caused by heart failure and can impact the integrity of the skin if severe (as the skin becomes stretched and easily damaged).
3.Palpate the pulses in the legs to briefly assess the arterial blood supply of each leg:
Femoral pulse: mid-inguinal point (halfway between the anterior superior iliac spine and the pubic symphysis)
Popliteal pulse: inferior region of the popliteal fossa
Posterior tibial pulse: posterior to the medial malleolus of the tibia
Dorsalis pedis: dorsum of the foot
Phlebitis is the inflammation of a vein. It most commonly occurs in superficial veins. Phlebitis often occurs in conjunction with thrombosis and is then called thrombophlebitis. It is typically caused by trauma and infection (e.g. secondary to insertion of an intravenous cannula). In a small number of cases it can be caused by systemic inflammatory disorders such as lupus.
[ps2id id=’3′ target=”/]
Percussion (“Tap test”)
The “Tap test” allows a crude assessment of the competency of venous valves.
1. Place one finger with a small amount of pressure onto the saphenofemoral junction (SFJ) which is located 4cm inferior-lateral to the pubic tubercle.
2. Tap the varicose vein you are assessing, which should be located lower down the leg.
3. If a thrill is felt by your finger over the SFJ, this suggests that there is continuity of the vein secondary to incompetent valves (as normally the venous valves should prevent the thrill transmitting along the entirety of the vessel).
[ps2id id=’4′ target=”/]
Auscultation
1. With the bell of your stethoscope auscultate any varicosity you have identified.
2. The presence of a bruit indicates turbulent blood flow which may suggest an underlying arteriovenous malformation.
[ps2id id=’5′ target=”/]
Special tests
Trendelenburg test (a.k.a Tourniquet test)
This test is used to locate the site of the incompetentvenousvalves.
If using fingers, it is called the Trendelenburgtest, if using a tourniquet instead it’s called the Tourniquettest.
You should assess onelegatatime.
1. Position the patient lying flat on the examination couch
2. Lift the patient’s leg up (as far as the patient is comfortable with) and empty the superficial veins by “milking” the leg towards the groin (SFJ).
3. Place a tourniquet over the saphenofemoral junction (SFJ) – this is found approximately 2-3cm below and lateral to the pubic tubercle.
4. Ask the patient to stand and observe for filling of the veins:
At this point, if the veins have not filled and remain collapsed, it indicates the incompetent venous valve(s) was at the level of the SFJ
If the veins have filled up again, it indicates the incompetent valve(s) are inferior to the SFJ (i.e. perforator veins – veins that drain venous blood from superficial to deep veins within the muscle)
5. Repeat the test with the patient lying, place tourniquet 3cm lower than the previous position, ask the patient to stand and observe venous filling.
6. Repeat until filling stops and the location of the incompetent venous valves is localised.
Cough impulse test
1. Place your hand over the saphenofemoral junction (2-3cm below and lateral to the pubic tubercle) and ask the patient to cough.
2. If you feel an impulse over the SFJ this indicates a Saphena Varix (dilatation of the saphenous vein at the SFJ).
Perthe’s test
Perthe’s test is used to distinguish between venous valvular insufficiency in the deep, perforator and superficial venous systems.
1. Apply a tourniquet at the proximal mid-thigh level whilst the patient is standing.
2. Ask the patient to walk around the room (or continually alternate between standing on tip-toes and flat feet) for 5 minutes.
Varicose veins become less distended
If the varicose veins become lessdistended, it suggests that there is nodeepvenousvalvularinsufficiency, because the calf muscle is able to empty the varicoseveins by pumping blood from the superficial venous system to the deep venous system. This result would suggest there is a primary problem with the superficial veins.
Varicose veins stay the same or become more distended
If the varicose veins remaindistended (or become more distended) it suggests there isalsoaproblem with the deepvenoussystem, preventing the drainage of blood from the superficial varicose veins. In this circumstance, the patient may also experience pain in the leg due to venoushypertension. A potential cause of deep venous obstruction is a deepveinthrombosis.
[ps2id id=’6′ target=”/]
To complete the examination…
Thank the patient and ask if they need any help getting dressed
Wash hands
Document your findings in the notes
Suggest further assessment and investigations
Abdominal examination: Occasionally increased pressure in the abdomen or pelvis (e.g. a large tumour) can occlude venous return from the legs leading to varicose veins
Doppler ultrasoundof any varicosities noted: Allows further investigation of incompetent venous valves and can identify thrombosis
3. By James Heilman, MD [CC BY-SA 4.0 (https://creativecommons.org/licenses/by-sa/4.0)], from Wikimedia Commons
4. By Prof. Dr. med. Gerd Hoffmann [CC BY-SA 3.0 de (https://creativecommons.org/licenses/by-sa/3.0/de/deed.en)], from Wikimedia Commons
5. By Intermedichbo (Milorad Dimić M.D.) [GFDL (http://www.gnu.org/copyleft/fdl.html) or CC BY 3.0 (https://creativecommons.org/licenses/by/3.0)], via Wikimedia Commons
6. By Jonathan Moore [CC BY 3.0 (https://creativecommons.org/licenses/by/3.0)], via Wikimedia Commons
7. By OpenStax College [CC BY 3.0 (https://creativecommons.org/licenses/by/3.0)], via Wikimedia Commons
8. By Nini00 [CC BY-SA 3.0 (https://creativecommons.org/licenses/by-sa/3.0)], from Wikimedia Commons
This basiclifesupport (BLS) guide aims to provide an overview of performing cardiopulmonary resuscitation (CPR) in a hospital setting, which is a common OSCE scenario.
This guide is based on the Resuscitation Council (UK) guidance and is intended only for students preparing for their OSCE exams and not for patient care.
Check out our basic life support (BLS) OSCE mark scheme here.
Chain of survival
The chain of survival refers to a series of actions that, properly executed, reduce the mortality associated with cardiac arrest. Like any chain, the chain of survival is only as strong as its weakest link.
The four interdependent links in the chain of survival are:
Early recognition and call for help
Early CPR
Early defibrillation
Early advanced cardiac life support
1. Ensure personal safety
Check the patient’s surroundings are safe before approaching (if you injure yourself, you will not be able to help the patient, so take this seriously)
Put on gloves (and other personal protective equipment) as soon as possible
Be careful with sharps during resuscitation
2. Check the patient for a response
The first step is to assessforaresponse.
Gently shake the patient’s shoulders and askloudly “Hello can you hear me?” or “Are you alright?”.
Shout for help: This is absolutely essential, as you will not be able to effectively assess and treat the patient alone.
Position the patient and inspect the airway
Position the patient on their back
Open their airway using a head-tilt and chin-lift manoeuvre
Inspect the airway for obvious obstruction. If an object is seen to be obstructing the airway, use a fingersweep or suction to remove obstructions that are in lineofsight.
Assess for signs of life
With the airwayheldopen (using the head-tilt and chin-lift manoeuvre), positionyourhead looking down towards the chest, with your cheek above the patient’s mouth.
If the patient is suspected to have suffered significanttrauma (with potential spinal involvement) perform a jaw-thrust rather than a head-tilt chin-lift manoeuvre.
In addition, you should place twofingers over the carotidartery to assess for a pulse at the same time.
Look, listen and feel to assess if the patient is breathing for 10 seconds (ideally, you should expose the chest to assess breathing):
Observe for chest rising and falling
Listen for any evidence of breath sounds
Feel for air blowing against your cheek
Look for any other signs of life (e.g. movement)
Agonal breathing
If the patient has occasional, irregulargasps of breath, this does not qualify as a sign of life as it commonly occurs in cardiac arrest and is referred to as agonalbreathing.
A pulse is present, but the respiratory rate is low
If the respirationrate is below12 – assist ventilation with bagvalvemask (BVM) to maintain 10 breaths/min (re-checking the pulse every minute to ensure it is still present).
You will likely need twopeople to perform effectiveventilation with a BVM (one ensuring a good seal over the face and the other compressing the bag to deliver the oxygen).
The BVM should ideally be connected to high-flow oxygen as soon as possible.
A pulse is present and respiratory rate is acceptable
If you feel a pulse or evidence of genuinebreathing, the patient would need urgent medical assessment (using an ABCDE approach) to stabilise them before further deterioration.
4. No signs of life
Call the resuscitation team (a.k.a. “crash team”)
If there are nosignsoflife, you need to callforhelp from the resuscitation team and commence CPR.
If more than one person is present, you can do these tasks simultaneously, however, if you are alone, you should leavethepatient and gethelpfirst (as this will ensure the resuscitation team attend and can commence advanced life support).
In a hospital, calling for help involves calling2222 to request urgent input from the resuscitationteam
When calling2222 it is important to clearly state your location (e.g. ward) and the typeofcardiacarrest (e.g. adult or paediatric) as this will inform which team members attend.
Perform chest compressions
The patient needs to be positioned on a flat, hardsurface for effective compressions to be possible.
Deliver 30 chest compressions followed by 2 ventilations and repeat.
Place one hand on top of the other in the centre of the lowerhalfofthesternum.
Aim to compress the chest by approximately one-third of the depth of the chest wall (5-6cm), as this allows for sufficient emptying of the cardiac ventricles.
Perform compressions at approximately 100-120 compressions per minute.
Make sure to allow the chest to fullyrecoil (this allows enough time for the heart’s chambers to refill before the next compression).
It is absolutely essential to minimiseinterruptions to chest compressions.
Alternate the person performing chest compressions at 2-minute intervals (if enough team members are present)
If trachealintubation is performed, chestcompressions should then be continued without any interruption at a rate of 100-120 a minute.
Example of chest compressions 3
Ventilate the patient
Perform a head-tilt chin-lift manoeuvre to opentheairway and allow effectiveventilation.
Pinch the nostrils closed with your thumb and index finger.
Place your mouth tightly over the patient’s mouth (or use a pocket-mask or bag-valve-mask if available)
Deliver 2 breaths (with an inspiratorytime of approximately 1 second) and watch for the patient’s chest rising (which confirms you are ventilating them).
Releasethenostrils and observe for the patient’s chestfalling as the air is exhaled.
You should then begin performing another 30 chest compressions.
Add supplementaloxygen as soon as you are able to.
Mouth-to-mouth ventilation
In clinical settings, mouth-to-mouth ventilation is not often used because of clinical reasons (e.g. concerns regarding infections) or because airway equipment is available (e.g. pocket-mask, bag-mask or anaesthetic input for tracheal intubation).
If there are clinical reasons to avoid mouth-to-mouth ventilation, perform chest compressions until help and airway equipment arrives.
Defibrillation
Attach the AED
Once an automatedexternaldefibrillator (AED) arrives, it is import to attach the 2 self-adhesive pads immediately to the patient’s chest (as labelled):
ADHESIVE PAD 1: To the rightof the sternum below the clavicle
ADHESIVE PAD 2: In the mid-axillary line with its long axis vertical and sufficiently lateral
If the patient is hairy, you may need to shave the areas to allow adequate contact between the pads and the skin
Check for piercings and remove as these can cause burns to the patient during defibrillation (however doing this should not significantly delay defibrillation)
Turn on the AED
TurnontheAED and follow the audio-visual instructions:
Typically the AED will ask you to pausechestcompressions whilst it performs a rhythmcheck.
It will then indicate if the rhythm is shockable or non-shockable and instruct you to deliverashock if it is the former.
If a shock needs to be delivered, ensure you and no one else is in contact with the patient and press the deliver shockbutton on the AED
Re-commence CPR after the shock is delivered and follow further instructions from the AED (which will typically involve another rhythm check in 2 minutes).
Advancedlifesupport would be commenced once the resuscitation team arrives.
If signs of life present or the patient responds to treatment
Arrange an urgent medical assessment
Call for urgentmedicalassessment which may be the same resuscitationteam as for cardiac arrest, or a dedicated medicalemergencyteam.
Assess ABCDE
Re-assess the patient using a structured ABCDE approach:
Airway: Ensure airway patent
Breathing: Give oxygen and monitor with pulse oximetry
Circulation: Record blood pressure, obtain venous access, attach ECG monitoring
Disability: Assess AVPU/GCS and check a capillary blood glucose
Exposure: Inspect for evidence of trauma or other clues as to a diagnosis (e.g. rash or bleeding)
Prepare to handover to the attending medical teams using an SBAR structure (see our guide here)
References
1. Resuscitation Council (UK). Resuscitation Guidelines 2015. Authors: Carl Gwinnutt, Robin Davies, Jasmeet Soar. Accessed August 15th 2018. Available from: [LINK].
2. By BruceBlaus [CC BY-SA 4.0 (https://creativecommons.org/licenses/by-sa/4.0)], from Wikimedia Commons
3. By Video by Bangkok Hospital PhuketSegment extracted and converted by Mikael Häggström [CC BY 3.0 (https://creativecommons.org/licenses/by/3.0)], via Wikimedia Commons
pGALS examination (Paediatric Gait, Arms, Legs and Spine) is often used as a quick screening tool to detect locomotor abnormalities and functional disability in a child. This pGALS examination OSCE guide demonstrates how to perform the assessment in a step by step manner. Check out this excellent freepGALS app, which provides a comprehensive step-by-step guide to the examination, with examples of pathology.
Confirm the child’s details (e.g. name and date of birth)
Explain the examination: “Today I’m going to ask you to do a number of different movements with your head, arms and legs.”
Gain consent: “Does that sound ok?”
Expose the child’s chest, upper and lower body (ideally, the child should be wearing shorts)
Ask if the child has any pain anywhere before you begin the examination
Throughout the pGALS assessment, you should adopt a “Copy me” approach, where you first demonstrate what you want the child to do (this can be easier for the child to follow than simply a sequence of verbal instructions)
Look for non-verbal clues of discomfort (e.g. grimacing)
[ps2id id=’1′ target=”/]
Screening questions
Do you (or does your child) have any pain or stiffness in your (their) muscles, joints or back?
Do you (or does your child) have any difficulty getting yourself (him/herself) dressed without any help?
Do you (or does your child) have any problem going up and down stairs?
[ps2id id=’2′ target=”/]
Inspection
Ask the child to stand with their hands by their sides whilst you inspect from the front, side and behind for any abnormalities.
Front
Posture:
Note any obvious asymmetry/scoliosis
Body habitus:
Obesity can be associated with joint pathology (e.g. slipped capital femoral epiphysis)
A thin malnourished child may be at risk of osteomalacia
Skin rashes:
Salmon coloured plaques with silvery scale over extensor surfaces is typical of psoriasis
Asymmetry of the shoulders may be due to unilateral wasting or scoliosis of the spine
Spinal alignment:
Look for evidence of scoliosis (S-shaped spine)
Iliac crest alignment:
Pelvic tilt may suggest hip abductor weakness
Gluteal muscle bulk:
Wasting of gluteal muscles suggests reduced mobility
Popliteal swellings:
Baker’s cyst (non-pulsatile)
Popliteal aneurysms (pulsatile)
Both of these are unlikely to be found in children
Hind-foot abnormalities:
Thickening of the Achille’s tendon may suggest tendonitis
Inspect from behind
[ps2id id=’3′ target=”/]
Gait
Ask the child to walk to the end of the room, turn around and come back. Then ask them to do this again on their heels and then on their tiptoes whilst you observe:
Inspect the gait cycle (heel strike, toe-off) and coordination to assess if this is appropriate for the child’s age
When the child reaches the end of the room, are they able to turn quickly without any issues?
Is there any evidence of pain? (antalgic gait)
Inspect foot posture, paying attention to the presence (or absence) of the longitudinal arches of the feet when the child is on their tiptoes (flat feet are normal in young children, but the medial longitudinal arches should appear when the child stands on their tiptoes)
Assessing gait in this way screens for pathology in the ankles, subtalar, midtarsal and smalljoints of the feet and toes.
Observe gait cycle
Observe walking on tiptoes
Observe walking on heels
[ps2id id=’4′ target=”/]
Arms
Ask the child to hold their hands out in front of them, with their palms facing down and fingers outstretched:
This assesses forward flexion of the shoulders, elbow extension, wrist extension and extension of the small joints of the fingers
Inspect the backs of the hands for asymmetry, joint swelling and deformity
Inspect the nails for signs associated with psoriasis (e.g. nail pitting)
Ask the child to turntheirhandsover (supination):
This assesses wrist and elbow supination
Inspect the muscle bulk of the palms (thenar/hypothenar eminences) for evidence of wasting
Restriction of supination suggest wrist or elbow pathology
Ask the child to makeafist whilst observing hand function:
This assesses flexion of the small joints of the fingers and hand function
The child may be unable to make a fist if they have joint swelling (e.g. inflammatory arthritis or infection) or if they have other deformities of the small joints of the hands
Ask the child to touch each finger in turn to their thumb (precision grip):
This assesses co-ordination of the small joints of the fingers and thumbs
It also assesses overall manual dexterity (which should be assessed in the context of the child’s age)
Reduced manual dexterity may suggest inflammation or joint contractures of the small joints of the hand
Gently squeeze across the metacarpophalangeal (MCP) joints:
Observe for non-verbal signs of discomfort
Inspect for symmetry of the MCP joints
Tenderness indicates active inflammatory arthropathy
Ask the child to put their handstogetherpalmtopalm:
This assesses extension of the small joints of the fingers and wrists, in addition to flexion of the elbows
Restriction or asymmetry of movement suggests joint pathology
An excessive range of movement suggests hypermobility
Ask the child to put their handstogetherbacktoback:
This assesses flexion of the wrist joints and elbow joints
Restriction or asymmetry of movement suggests joint pathology
An excessive range of movement suggests hypermobility
Ask the child to “Reach up and touch the sky”:
This assesses elbow extension, wrist extension and shoulder abduction
Ask the child to reach up as far as they can manage, keeping their arms straight
Restriction or asymmetry of movement suggests joint pathology
An excessive range of movement suggests hypermobility
Ask the child to lookattheceiling:
This assesses cervical extension
Ask the child to put their handsbehindtheir neck:
This assesses shoulder abduction and external rotation in addition to elbow flexion
Restricted range of movement suggests shoulder or elbow pathology
An excessive range of movement suggests hypermobility
Ask the child to hold their hands out in front of them, with their palms facing down and fingers outstretched
Ask the child to turn their hands over (supination)
Ask the child to make a fist whilst observing hand function
Ask the child to touch each finger in turn to their thumb (precision grip)
Gently squeeze across the metacarpophalangeal (MCP) joints
Ask the child to put their hands together palm to palm
Ask the child to put their hands together back to back
Ask the child to “Reach up and touch the sky”
Ask the child to look at the ceiling
Ask the child to put their hands behind their neck
[ps2id id=’5′ target=”/]
Legs
Position the child lying down on the examination couch.
Assess activekneeflexion and extension whilst feeling for crepitus:
Ask the child to “Try and bring your heel towards your bottom.” and then “Straighten out your leg on the bed.”
Test one leg at a time
Assess and compare the degree of flexion and extension of the knee joints
Restricted flexion or extension suggests knee pathology (e.g. active inflammatory arthritis or joint contractures)
A swollen, red knee joint is suggestive of inflammatory arthritis, haemarthrosis or joint sepsis
Assess passive knee flexion and extension:
Assess one limb at a time
Flex and then extend the knee whilst feeling for crepitus over the patella
Note the range of movement and any asymmetry between knee joints
Assess passive internal rotation of the hipjoint (hip and knee joint should be flexed to 90º for assessment):
Internal rotation of the hip joint is often the first movement to be reduced in hip pathology, making it a useful screening test
Note the range of movement and any asymmetry between hip joints
Patellar tap (assessing for knee joint effusion)
1. Empty the suprapatellar pouch by sliding your left hand down the thigh to the patella.
2. Keep your left hand in position and use your right hand to press downwards on the patella with your fingertips.
3. If there is fluid is present you will feel a distinct tap as the patella bumps against the femur.
It should be noted that small effusions may not be detected using patellar tap alone.
Assess active knee flexion and extension whilst feeling for crepitus
Assess active knee extension
Assess passive knee flexion
Assess passive knee extension
Assess passive internal rotation of the hip joint (hip and knee joint should be flexed to 90º for assessment)
Perform patellar tap test
[ps2id id=’6′ target=”/]
Spine
Inspect the child’s spine:
Looking from behind for evidence of scoliosis (asymmetrical shoulders and pelvic girdle)
Look from the side for abnormalities of lordosis (loss of lordosis due to sacroiliac disease) or kyphosis
Assess lateral flexion of the cervical spine:
Ask the child to tilt their head to each side, moving their ear towards their shoulder
“Try and touch your shoulder to your ear”
Assess the temporomandibular joint (TMJ):
Ask the child to open their mouth wide and put three of their fingers into their mouth (demonstrate using your own fingers and mouth)
This manoeuvre assesses the temporomandibular joint’s range of movement and screens for deviation of jaw movement
Restricted jaw opening may be due to temporomandibular joint disease
Assess lumbar flexion:
1. Place 2 fingers on the lumbar vertebrae
2. Ask the child to bend forward and touch their toes
3. Observe your fingers as the child’s lumbar spine flexes (they should move apart)
4. Observe your fingers and the child extends their spine to return to a standing position (your fingers should move back together)
If the child is able to place their hands flat on the floor it suggests joint hypermobility.
Inspect the spine
Assess lateral flexion of the cervical spine
Assess lumbar flexion
Assess lumbar flexion
[ps2id id=’7′ target=”/]
To complete the examination
Thank the child
Wash your hands
Summarise your findings
Suggest further assessments and investigations
Perform a focused examination of joints with suspected pathology
Request further imaging of joints with suspected pathology (e.g. X-ray/CT/MRI)
References
1. Professor Helen Foster (Professor of Paediatric Rheumatology). Paediatric Musculoskeletal Matters (PMM) Online. Guide to pGALS assessment. [Available here]
Recommended reading
Check out this excellent freepGALSapp, produced by Paediatric Musculoskeletal Matters (PMM). It provides a comprehensive step-by-step guide to the examination, with included images of relevant pathology. [Available here]
Want to learn more about the pGALS assessment? Check out the free eModule produced by Professor Helen Foster in collaboration with Newcastle University [Available here]
Arthritis research UK provides some excellent free guides to musculoskeletal examination and history taking [Available here]
Speculum examination frequently appears in OSCEs. You’ll be expected to competently perform the procedure and demonstrate appropriate communications skills with the patient or mannequin. This speculum examination OSCE guide provides a clear step by step approach to performing the procedure.
Confirm the patient’s details (e.g. name and date of birth)
Ask if the patient could currently be pregnant
Explain the procedure (as shown below)
Wash hands
[ps2id id=’1′ target=”/]
Explanation
Assess the patient’s current understanding:
“I’ve been asked to perform a speculum examination.”
“Do you understand what this procedure involves?”
Explain the procedure:
“What the procedure will involve is me inserting a small plastic device called a speculum into the vagina. This will allow me to visualise the neck of the womb.”
“The procedure shouldn’t be painful however it will feel a little uncomfortable.”
“If at any point you want me to stop the procedure, please let me know. You may also experience some light vaginal bleeding after the procedure.”
Explain the need for a chaperone:
“For this examination one of the female ward staff will be present acting as a chaperone.”
Check the patient’s understanding and gain consent:
“Do you understand everything I’ve explained?”
“Do you have any questions?”
“Are you happy for me to perform the procedure?”
Ask if the patient would like to go to the toilet to empty their bladder before the examination.
[ps2id id=’2′ target=”/]
Gather equipment
Gloves
Lubricant
Speculum
A light source for the speculum
[ps2id id=’3′ target=”/]
Position
The patient should be positioned supine on a bed with their underwear removed and their abdomen exposed (a modesty cloth should be provided):
“I need you to go behind the curtain and remove your underwear. Could you please then get onto the bed and cover yourself with the cloth provided.”
Position the patient in the modified lithotomy position:
“Bring your heels towards your bottom and then let your knees fall to the side.”
[ps2id id=’4′ target=”/]
Inspection
Preparation
Don gloves
Inspect the vulva
Ulcers (e.g. genital herpes)
Abnormal vaginal discharge (e.g. chlamydia or gonorrhoea)
Scars from previous surgery (e.g. episiotomy)
Vaginal atrophy (secondary to post-menopausal changes)
Masses (e.g. Bartholin’s cyst)
Varicosities (varicose veins secondary to venous disease/obstruction in the pelvis)
Don gloves
Inspect the vulva
[ps2id id=’5′ target=”/]
Inserting the speculum
1. Warnthepatient you are about to insert the speculum
2.Use your left hand (index finger and thumb) to separate the labia
3.Gently insert the speculum sideways (blades closed, angled downwards and backwards)
4.Once inserted, rotate the speculum back 90 degrees (so that the handle is facing upwards)
5. Openthespeculum blades until an optimal view of the cervix is achieved
6. Tighten the lockingnut to fix the position of the blades
Gently insert the speculum sideways with the blades closed
Once inserted rotate the speculum back 90 degrees
Open the speculum blades gently to obtain optimal view of the cervix
Fix the position of the speculum using the locking nut
Visualising the cervix
Inspect the cervix
External os (note if open or closed)
Cervical erosions (e.g. ectropion)
Masses (e.g. cervical malignancy)
Ulcers (e.g. genital herpes)
Abnormal discharge (e.g. bacterial vaginosis)
Inspect the cervix
Removing the speculum
1.Loosen the lockingnut on the speculum and partiallyclosetheblades
2.Rotate the speculum90degrees, back to its original insertion orientation
3. Gently remove the speculum, inspecting the walls of the vagina as you do so
4.Re-cover the patient
5. Dispose of the speculum and gloves
6.Washhands
Loosen the locking nut
Gently remove the speculum, with the blades partly closed, inspecting the vaginal walls as you do so
Dispose of your equipment into an appropriate clinical waste bin
Wash hands.
[ps2id id=’6′ target=”/]
To complete the procedure…
Thank the patient
Allow the patient time to get re-dressed
Label the sample
Document the procedure in the medical notes including the details of the chaperone
Summarise findings
“On examination of Mrs Smith, a 29-year-old female, there were no abnormalities of the vulva noted on inspection. Speculum examination revealed a healthy cervix, with the external os closed and no abnormal masses or discharge present.”
This guide provides an overview of how to perform a herniaexamination in an OSCE setting. It also includes a generic approach to assessing lumps and discusses how to differentiate between direct and indirect inguinal hernias.
Confirm the patient’s details (e.g.name and date of birth)
Explain the procedure:
“Today I need to perform an examination of the lump you are concerned about, which will involve me having a look and feel of the lump.”
“It shouldn’t be painful, however, it might be a little uncomfortable. If at any point you are in pain or would like me to stop, just let me know.”
“For this examination, I will need you to have your trousers and underwear off to allow me to assess the lump. If you feel uncomfortable at any point, let me know and we can stop the examination.”
Explain the need for a chaperone:
“For this examination one of the nursing staff will be present acting as a chaperone.”
Check the patient’s understanding and gain consent:
“Do you understand everything I’ve explained?”
“Do you have any questions?”
“Are you happy for me to perform the procedure?”
Check if the patient has any pain before you begin:
“Are you currently experiencing pain anywhere?”
General Inspection
Ask the patient to stand (if able) or lay down whilst you observe for the following:
Note any evidence of pain (e.g. stance/grimacing)
Note the patient’s overall colour (e.g. pallor secondary to anaemia or jaundice)
Note any evidence of abdominal distension (may suggest bowel obstruction, possibly due to an incarcerated hernia)
Note any muscle wasting or cachexia suggestive of underlying malignancy
Look around the bed for evidence of vomit bowels or medication boxes
Close Inspection
1. Inspect the patient from the front and both sides (whilst the patient is standing or lying down), looking for evidence of:
Asymmetry
Scars on the abdomen and in the groin
Obvious lumps protruding from the abdomen or groin
Any testicular lumps or swellings
2. Ask the patient to cough, which should accentuate any hernia that is present.
Assessing a Lump
Throughout the examination, it is important to explain to the patient what you are about to do next, to ensure they are informed and can voice any concerns.
A Generic Approach to Assessing a Lump
If a lump is noted during the inspection, you should start with a generic lump assessment, before moving onto a more specific hernia assessment.
Site
Be precise (e.g. mid-point of the inguinal canal)
If there are multiple lumps, this is more suggestive of superficial lymph nodes, superficial lesions (e.g. lipoma) or dermatological problems (e.g. large skin lesions)
Size
Use a tape measure if available (otherwise, a shortcut is to measure and memorise the length of the distal phalanx of your index finger, and use that as a reference)
Shape
This refers to the whole outline of the lump (e.g. round/oval/irregular/well-defined)
Colour
Is the lump a different colour from the surrounding skin (e.g. erythematous)?
Contour
This refers to the look and texture of the skin overlying the lump
Is it same as rest of the skin, or thick/rough/scaly/smooth/shiny?
Consistency
Comment whether the lump is hard, firm, soft or nodular
Hard corresponds to the feel of your forehead, firm to the tip of your nose, and soft to your lip
Tenderness
Press on the lump and look at the patient’s face to see if they grimace
Ask the patient if the lump is painful
Is the whole lump tender or just a part of it?
Temperature
Palpate the temperature using the back of your hand, comparing to surrounding tissue
Significantly increased temperature suggests infection (e.g. abscess) and will normally be associated with erythema
Tethering
Is the lump freely mobile, or is it tethered to a structure such as skin or muscle?
Malignant lumps are often fixed to surrounding tissue
Cough impulse
Ask the patient to cough whilst you palpate the lump
A positive cough impulse occurs when you see and/or feel the lump increase in size when the patient coughs
A cough impulse indicates a communication between the intra-abdominal cavity and the lump (e.g. a hernia)
Transillumination
Ideally dim the lights in the room first
Shine a light through the lump and see if it illuminates
Transillumination suggests that the lump is cystic (e.g. hydrocoele)
Bruit
Auscultate the lump for a bruit (suggestive of vascular aetiology)
Listen for bowel sounds and if present, it suggests the lump contains bowel (e.g. as is often the case in a hernia)
Lymphadenopathy
Palpate the lymph nodes that drain the area the lump is located within (commonly the inguinal lymph nodes are assessed when an inguinal hernia is suspected)
Lymphadenopathy surrounding the lump suggests either infective or malignant aetiology
Assessment of a suspected hernia
The following hernia assessment should be performed on both sides of the groin, to avoid missing bilateral inguinal hernias.
Types of Hernia
It is important to understand the different types of hernia and the related anatomy, as this helps inform your clinical examination technique and interpretation of findings. Below is a very brief summary of hernia types, but you can read more in our Hernias Explained article.
Inguinal hernias
An inguinalhernia is a protrusion, or movement of abdominal contents, from within the abdominal cavity. This tissue then protrudes, or emerges, at the exit point, the superficial inguinal ring.
LOCATION:Inguinal hernias are most commonly found superomedial to the pubictubercle.
Femoral hernias
Femoralhernias occur just below the inguinal ligament, when abdominal contents pass through a naturally occurring weakness in the abdominal wall called the femoral canal.
It is important to note that the space a femoral hernia protrudes through is quite tight, and it is bordered medially by the sharp edge of the lacunar ligament. Therefore, femoral hernias are at high risk of strangulation and obstruction.
LOCATION: Femoral hernias are typically found infero-lateral to the pubictubercle (and medial to the femoral pulse).
Umbilical hernia
Umbilicalhernias, as the name suggests, occur at the site of the umbilicus and are common. They can be large but are typically low risk for strangulation.
LOCATION: Umbilical region
Incisional hernia
Incisional hernias occur at the sites of previous operations, where there has been incompletely-healed (weakened) surgical wound.
LOCATION: Clinically, incisional hernias present as a bulge or protrusion at or near the area of a surgical incision
Position of Hernia
Above and medial to the pubic tubercle: Inguinal hernia
Below and lateral to the pubic tubercle: Femoral hernia
Umbilical region: Umbilical/para-umbilical hernia
Reducibility
Check it the lump can be reduced (you can ask the patient to do this, or do it yourself)
If reduced completely, it may only reappear if the patient increases pressure (e.g. by coughing)
You can ask the patient to lie down and if the lump reduces spontaneously, this makes the diagnosis of a hernia highly likely.
Hernias are typically reducible, however, if a hernia is painful and irreducible it suggests that it is strangulated (this is a surgical emergency)
Direct vs Indirect Inguinal Hernia
Locate the deep inguinal ring (midway between the anterior superior iliac spine and pubic tubercle)
Ask the patient to reduce their hernia (if able) or alternatively reduce it yourself by starting inferiorly compressing the lump towards the deep inguinal ring
Once reduced, apply pressure over the deep inguinal ring
Ask the patient to cough
If a hernia reappears it is more likely to be a direct inguinal hernia whereas if it does not, it is more likely to be an indirect inguinal hernia
In the latter case, release the pressure from the deep inguinal ring and observe for the hernia reappearing (further supporting the diagnosis of an indirect inguinal hernia)
It should be noted that this clinical test is unreliable and further imaging (e.g. ultrasound scan) would be required before any management decisions were made
Scrotal Examination
Inguinal hernias can extend into the scrotum, so if you note swelling or suspect an inguinal hernia, palpation of the scrotum can be performed (with consent)
Typically, an inguinal hernia will present as a testicular lump that you can not get above
Auscultation
Auscultation of a hernia can be used to assess for the presence of bowel (bowel sounds will be present)
To complete the examination…
Thank the patient
Allow the patient time to get re-dressed
Document the examination in the medical notes including the details of the chaperone
Summarise findings
“On examination of Mr Smith, a 52-year-old gentleman, there was a round mass visible in the left groin above and medial to the pubic tubercle. It was non-tender, approximately 2cm in diameter, soft in consistency and reducible. There was a positive cough impulse and the hernia recurred despite pressure over the deep inguinal ring. There was no extension to the scrotum and no associated lymphadenopathy. The most likely diagnosis based on my clinical findings is a direct inguinal hernia. ”
1. By James Heilman, MD [CC BY-SA 3.0 (https://creativecommons.org/licenses/by-sa/3.0) or GFDL (http://www.gnu.org/copyleft/fdl.html)], from Wikimedia Commons
2. By PacoPeramo [CC BY-SA 3.0 (https://creativecommons.org/licenses/by-sa/3.0)], from Wikimedia Commons
Taking vaginal swabs is a common OSCE station. You’ll be expected to competently perform the procedure and demonstrate appropriate communications skills with the patient or mannequin. This guide to taking gynaecological swabs OSCE provides a clear step-by-step approach to performing the procedure.
Confirm the patient’s details (e.g.name and date of birth)
Ask if the patient could currently be pregnant
Explain the procedure (as shown below)
Wash hands
Explanation
Assess the patient’s current understanding:
“I’ve been asked to take some vaginal swabs today.”
“Do you understand what this procedure involves?”
Explain the procedure:
“What the procedure will involve is me inserting a small plastic device called a speculum into the vagina. This will allow me to visualise the inside of the vagina and the neck of the womb.”
“The procedure shouldn’t be painful however it will feel a little uncomfortable.”
“If at any point you want me to stop the procedure, please let me know. You may also experience some light vaginal bleeding after the procedure.”
Explain the need for a chaperone:
“For this examination one of the female ward staff will be present acting as a chaperone.”
Check the patient’s understanding and gain consent:
“Do you understand everything I’ve explained?”
“Do you have any questions?”
“Are you happy for me to perform the procedure?”
Ask if the patient would like to go to the toilet to empty their bladder before the examination.
Gather equipment
Clean tray
Gloves
Lubricant
Speculum
A light source for the speculum
Swabs:
High vaginal swab and endocervical swab (charcoal media swabs x2)
Chlamydia swab pack (endocervical)
Position
The patient should be positioned supine on a bed with their underwear removed (a modesty cloth should be provided):
“I need you to go behind the curtain and remove your underwear. Could you please then get onto the bed and cover yourself with the cloth provided.”
Position the patient in the modified lithotomy position:
“Bring your heels towards your bottom and then let your knees fall to the side.”
Inspection
Preparation
Don gloves
Open the packaging but leave the equipment inside and place in the clean tray.
Inspect the vulva
Ulcers (e.g. genital herpes)
Abnormal vaginal discharge (e.g. chlamydia or gonorrhoea)
Don gloves
Inspect the vulva
Inserting the speculum
1. Warnthepatient you are about to insert the speculum
2.Use your left hand (index finger and thumb) to separate the labia
3.Gently insert the speculum sideways (blades closed, angled downwards and backwards)
4.Once inserted, rotate the speculum back 90 degrees (so that the handle is facing upwards)
5. Openthespeculum blades until an optimal view of the cervix is achieved
6. Tighten the lockingnut to fix the position of the blades and hold in place with your non-dominant hand (otherwise, it can slide out)
Gently insert the speculum sideways with the blades closed
Once inserted rotate the speculum back 90 degrees
Open the speculum blades gently to obtain optimal view of the cervix
Fix the position of the speculum using the locking nut
Visualising the cervix
Inspect the cervix
Cervicitis (e.g. gonorrhoea or chlamydia)
Cervical erosions (e.g. ectropion)
Masses (e.g. cervical malignancy)
Ulcers (e.g. genital herpes)
Abnormal discharge (e.g. bacterial vaginosis)
Inspect the cervix
Taking the vaginal swabs
Swab technique
Pick up the swab’s sample tube using your dominant hand and pass it to your non-dominant hand (which should also be stabilising the speculum)
Remove the lid of the sample tube using your dominant hand and place in the tray
Pick up the swab itself with your dominant hand and take the sample (see below for specifics depending on the swab being used)
Place the used swab back into its tube, which should still be in your non-dominant hand and tighten the lid
Place the completed swab into the tray
Double vs Triple swabs
Depending on your local hospital guidelines you may be expected to take “double swabs” or “triple swabs”:
Double swabs include a NAAT swab to test for both chlamydia and gonorrhoea and a high vaginal charcoal swab to test for fungal and bacterial infections such as candida albicans and bacterial vaginosis.
Triple swabs include an endocervical chlamydia swab (usually in a pink wrapper), an endocervical sample using a charcoal swab to pick up gonorrhoea and a third sample, using a charcoal high vaginal swab to test for fungal and bacterial infections.
Swab details
The swabs are listed below in the order which you should take them.
1. Endocervical Chlamydia Swab (NAATS)
Technique:
This sample kit comes with an additional cleaning swab
The large tipped white cleaning swab should be used to remove excess mucus from the cervical area to allow visualisation of the external os and then discarded
Remove the testing swab from the tube and gently insert it into the endocervix by approximately 5mm
Rotate the swab for 10-15 seconds in the endocervix
Remove the swab and break off into the transport tube at the score line on the shaft
Screw the lid onto the sample tightly
Screens for:
Chlamydia and Gonorrhoea
NAATS stands for Nucleic Acid Amplification Tests
2. Endocervical Charcoal Media Swab
Technique:
Remove the testing swab from the tube and gently insert it into the endocervix by approximately 5mm
Rotate the swab for 10-15 seconds in the endocervix
Remove the swab and break off into the transport tube at the score line on the shaft
Screw the lid onto the sample tightly
Screens for:
Gonorrhoea
3. Hi-vaginal Charcoal Media Swab
Technique:
Insert the charcoal media swab into the posterior fornix, where discharge frequently pools
Rotate the swab for 10 seconds, or for the length of time recommended in the manufacturer’s instructions
Place the swab into the sample tube and screw the lid on tightly
Screens for:
Bacterial vaginosis
Trichomonas vaginalis
Candida
Group B streptococcus
Removing the speculum
1.Loosen the lockingnut on the speculum and partiallyclosetheblades
2.Rotate the speculum90degrees, back to its original insertion orientation
3. Gently remove the speculum, inspecting the walls of the vagina as you do so
4.Re-cover the patient
5. Dispose of the speculum and gloves
6.Washhands
Loosen the locking nut
Gently remove the speculum, with the blades partly closed, inspecting the vaginal walls as you do so
Dispose of your equipment into an appropriate clinical waste bin
Wash hands.
To complete the procedure…
Thank the patient
Offer them some tissue to clean themselves
Allow the patient time to get re-dressed
Label the samples:
Name / Date of birth / Patient identification number / Address
GP name and address
Specimen type
Specimen site
Other relevant clinical details
Send vaginal swab samples for processing
Advise the patient that they’ll be contacted with results via their preferred method (e.g. face to face or text message)
Document the procedure in the medical notes including the details of the chaperone
The Dix-Hallpike test is a diagnostic manoeuvre used to identify benign paroxysmal positional vertigo (BPPV).
The Epley Manoeuvre is used to treat BPPV once it has been diagnosed (by the previously mentioned Dix-Hallpike test).
This article provides a step-by-step guide to performing both the Dix-Hallpike test and the Epley Manoeuvre in an OSCE setting.
Introduction
Wash hands
Introduce yourself to the patient
Confirm the patient’s details (name and date of birth)
Explain what the examination will involve:
“Today I’ve been asked to assess you in relation to the dizziness you’ve been experiencing. The first stage involves me moving you from a sitting to lying position briskly on the examination couch. The second stage will involve me holding your head whilst asking you to roll onto your side and then to sit upright.”
“The aim of these procedures is to potentially diagnose and treat the underlying problem causing your dizziness, however, I can’t guarantee a an improvement in your symptoms.”
Check if the patient has any back or neck problems (if so the examination may not be appropriate, given the significant amount of movement involved)
“Do you have any neck or back problems?”
“Do you have any pain anywhere currently?”
Gain consent to perform the examination:
“Do you feel you understand what the procedure involves?”
“Are you ok for me to perform the procedures I discussed?”
Contraindications
There are some absolute and relativecontraindications to the Dix-Hallpike/Epley maneuvres that you should be aware of. ¹
Absolute contraindications
Fractured odontoid peg
Recent cervical spine fracture
Atlanto-axial subluxation
Cervical disc prolapse
Vertebro-basilar insufficiency
Recent neck trauma
Relative contraindications
Carotid sinus syncope
Severe neck or back pain
Recent stroke
Cardiac bypass surgery within the last 3 months
Rheumatoid arthritis affecting the neck
Recent neck surgery
Cervical myelopathy
Severe orthopnea
Dix-Hallpike Test
Throughout this sequence of movements, make sure to warn the patient in advance of each step, so that they know what to expect.
1. Ask the patient to sit upright on the examination couch.
2. Adjust the patient’s position so that when supine, their head will hang over the edge of the bed, allowing for head extension below the horizontal plane.
3. Position yourself standing behind the patient (who should be sitting upright on the bed).
4. Turn the patient’s head 45º to one side.
5. Whilst supporting the neck, move the patient from their sitting position to a supine position (in one brisk smooth motion), ensuring their head hangs over the bed 30º below the horizontal plane.
6. Ask the patient to keep their eyes open throughout this process.
7. Inspect the patient’s eyes carefully for evidence of nystagmus for at least 30 seconds.
8. If no nystagmus is observed, the test is then complete for that side and you should carefully sit the patient up.
9. After a short break, the test should be repeated on the other side (turning the patient’s head in the opposite direction in step 4).
Positive test
If the test is positive, the patient will complain of vertigo and you should be able to directly observe nystagmus.
Nystagmus
You should note the following characteristics of the nystagmus:
Duration
Direction
Latency
The typical findings in BPPV include:
A 2-20 second latent period followed by the onset of torsional (rotary) or horizontal nystagmus:
Rotary nystagmus is the most common type and suggests the involvement of the superior semicircular canal
Horizontal nystagmus suggests the involvement of the lateral semicircular canal
Nystagmus typically lasts 20-40 seconds
The nystagmus typically wanes with repeated Dix-Hallpike tests
Epley Manoeuvre
When performing the Epleymanoeuvre, each position should be maintained until full resolution of symptoms and nystagmus has been achieved for at least 30 seconds.
1. The Epley manoeuvre typically follows on from a positive Dix-Hallpike test, so we will assume the patient is still positioned lying flat, with the head hanging over the end of the bed, turned 45º away from the midline.
2. Turn the patient’s head 90º to the contralateral side, approximately 45º past the midline (still maintaining neck extension over the bed). Keep the patient in this position for 30 seconds.
3. Whilst maintaining the position of the patient’s head, ask the patient to roll onto their shoulder (on the side their head is currently turned towards).
4. Once the patient is on their side, rotate the patient’s head so that they are looking directly towards the floor. Maintain this position for 30 seconds to a minute.
5. Sit the patient up sideways, whilst maintaining head rotation.
6. Once the patient is sitting upright, the head can be re-aligned to the midline and the neck can be flexed so that the patient is facing downwards (chin to chest). Maintain this position for 30 seconds.
The entire procedure can be repeated 2-3 times if needed, however, this will depend on whether the patient is able to tolerate further manoeuvres (as they often precipitate vertigo).
References
1. British Society of Audiology. Recommended Procedure for Hallpike Manoeuvre. Published 2014.
This article covers clinical signs that may be found on the hands during routine clinical examination. The list of clinical signs in this article is by no means exhaustive. Each sign is grouped with the system it is usually associated with (e.g. Janeway lesions and the cardiac system). Other associations are also given.
Notably, it does not cover rheumatologic signs in the hands, such as Heberden’s nodes, or swan neck deformity.
Cardiology
Splinter haemorrhages
Dark red/brown vertical lines seen at the top of the nail. They are small emboli lodged in the nail capillaries damaging vessel walls and causing localised haemorrhage. Causes include trauma, sub-acute bacterial endocarditis, scleroderma, and other autoimmune conditions.
Splinter haemorrhages: Micro-emboli deposited in the nail bed
Osler’s nodes
These painful, small, red lesions appear on the fingers. They are the result of immune complex deposition from bacterial endocarditis.
Osler’s nodes: Patient with bacterial endocarditis 1
Janeway lesions
Painless red spots appearing on the palms. Patients with bacterial endocarditis may develop these lesions from septic emboli causing microhaemorrhage.
Janeway lesions: Patient with endocarditis 2
Fingertip pallor
Fingers appear white and waxy as a result of vasoconstriction or vascular obstruction. Conditions associated with this include peripheral vascular disease, Raynaud’s, Buerger’s disease and CREST syndrome.
Finger pallor: Secondary Raynauds in Sjögrens syndrome 3
Respiratory
Nail clubbing
Nails have increased curvature resulting in the loss of the angle between the nail and nail fold. The exact cause is unclear but patients with clubbing have increased levels of platelets in the microcirculation around the nails resulting in the release of vascular endothelial growth factor (VEGF) and platelet-derived growth factor (PDGF).
Although clubbing can be the result of diseases across multiple systems, it is often related to respiratory pathology when appearing in clinical exams. It is important to remember that clubbing can, in some cases, be a normal finding.
Causes
Respiratory:
Cystic fibrosis
Tuberculosis
Pulmonary fibrosis
Bronchiectasis
Bronchial carcinoma
Cardiac:
Atrial myxoma
Cyanotic heart disease
Endocarditis
Pericarditis
Gastrointestinal:
Malabsorption
Inflammatory bowel disease
Liver cirrhosis
Nail clubbing 4
Carbon-dioxide retention flap (Asterixis)
Asterixis is a coarse tremor best seen with the patient’s wrists extended. It can be caused by hypercapnia, typically in conditions such as chronic obstructive pulmonary disease (COPD) and hypoventilation secondary to reduced consciousness level. Asterixis can also be caused by hyperammonaemia and uraemia.
Asterixis
Hepatology
Tendon/tuberous xanthomata
Yellow nodules typically noted over the dorsal aspects of the hands. Lipid-laden macrophages are deposited as the result of hypercholesteraemia.
Xanthomata over the knee joint 5
Leukonychia
These white, horizontal bands across the nails are the result of low albumin levels in the blood. This can be the result of either decreased albumin synthesis, as seen in liver disease, or the result of increased albumin loss, usually the result of kidney malfunction (nephrotic syndrome). Leukonychia may also be the result of chemotherapy treatment.
Leukonychia
Palmar erythema
Reddening of the palms from vasodilation. Associated pathology includes liver disease and resultant oestrogen excess, and hyperthyroidism.
Palmar erythema 6
Asterixis
This flapping-tremor is best elicited by asking the patient to fully extend their wrists and then close their eyes. It can be a sign of hepatic encephalopathy, usually related to long-term alcohol excess, and indicates high levels of ammonia in the blood sufficient to impact on the motor centres of the brain. Other causes include hypercapnia (as discussed previously) and uraemia.
Miscellaneous
Koilonychia
Classically described as ‘spoon-shaped’, these nails appear hollowed out or concave. They are associated with low levels of iron; this could be severe iron-deficiency anaemia, haemochromatosis, fungal infection, acromegaly, hypothyroidism or malnutrition.
Koilonychia 7
Nail pitting
Small indentions of the nail. Pathophysiology is unclear but this pitting is most commonly seen in patients with psoriasis.
Nail pitting in a patient with psoriasis 8
Dupuytren’s contracture
The 4th digit (or ring finger) is in a fixed-flexed position, with the tendon raised and visible on the palmar surface. This appearance is the result of thickening and shortening of the palmar fascia, possibly due to local hypoxia. Associations include smoking, alcohol use, diabetes, manual labour and trauma.
Dupuytren’s contracture 9
References
1. Roberto J. Galindo [GFDL (http://www.gnu.org/copyleft/fdl.html) or CC BY-SA 4.0 (https://creativecommons.org/licenses/by-sa/4.0)], from Wikimedia Commons
2. Warfieldian [CC BY-SA 4.0 (https://creativecommons.org/licenses/by-sa/4.0)], from Wikimedia Commons
3. Intermedichbo [CC BY-SA 3.0 (https://creativecommons.org/licenses/by-sa/3.0) or GFDL (http://www.gnu.org/copyleft/fdl.html)], via Wikimedia Commons
4. Desherinka [GFDL (http://www.gnu.org/copyleft/fdl.html) or CC BY-SA 4.0 (https://creativecommons.org/licenses/by-sa/4.0)], from Wikimedia Commons
5. Min.neel [CC BY-SA 3.0 (https://creativecommons.org/licenses/by-sa/3.0)], from Wikimedia Commons
Ultrasound neck +/- fine needle aspiration (FNA) for neck and salivary gland lumps
CT and MRI for any suspected oropharyngeal cancer
Example summary
“Today I performed an examination of the oral cavity on Mr Smith, a 30-year-old man who presented with a submandibular swelling. The most obvious finding on inspection was a small, erythematous swelling in the floor of his mouth. On bimanual palpation, the lump was hard, non-tender and immobile. To complete my assessment I would like to do a full examination of the neck and arrange an ultrasound scan of the lesion.”
References
1. Blausen.com staff (2014). “Medical gallery of Blausen Medical 2014”. WikiJournal of Medicine 1 (2). DOI:10.15347/wjm/2014.010. ISSN 2002-4436. [CC BY 3.0 (https://creativecommons.org/licenses/by/3.0)], from Wikimedia Commons
2. James Heilman, MD [CC BY-SA 3.0 (https://creativecommons.org/licenses/by-sa/3.0, from Wikimedia Commons
3. Klaus D. Peter, Gummersbach, Germany [CC BY 3.0 de (https://creativecommons.org/licenses/by/3.0/de/deed.en)], from Wikimedia Commons
4. Clara Polo Sabat [CC BY-SA 4.0 (https://creativecommons.org/licenses/by-sa/4.0)], from Wikimedia Commons
5. GalliasM [CC BY-SA 4.0 (https://creativecommons.org/licenses/by-sa/4.0)], from Wikimedia Commons
6. DRosenbach [CC BY-SA 3.0 (https://creativecommons.org/licenses/by-sa/3.0, from Wikimedia Commons
In OSCE scenarios, you may be asked to perform a focused examination to determine the presence (or absence) of a certain condition. It is important to be able to confidently elicit the main diagnostic signs of the condition. In order to do this, you need to be comfortable with the relevant basic system examination (i.e. for a Parkinson’s disease examination you need to be comfortable with performing a full neurological examination).
Note: the instructions may not be specific, for example, the station instructions may say, ‘examine this patient with a tremor’.
Parkinson’s Disease Overview
Parkinsonism is a clinical syndrome characterised by bradykinesia, rigidity, tremor and posturalinstability.
Idiopathic Parkinson’s disease (PD) is the most common cause of parkinsonism.
Other primary (atypical) Parkinsonian disorders can closely mimic PD, which makes a correct clinical diagnosis challenging. These include Progressive Supranuclear Palsy (PSP), Multiple System Atrophy (MSA), Dementia with Lewy Bodies (DLB) and Corticobasal Syndrome (CBS).
Pathology of Parkinson’s disease
Loss of dopaminergic neurons from the pars compacta of the substantia nigra.
Presence of Lewy bodies(eosinophilic cytoplasmic inclusion bodies), containing tangles of α-synuclein and ubiquitin. Spreading from the brainstem to the midbrain and then to the cortex as the disease progresses.
Clinical features of Parkinson’s disease
Parkinson’s is not simply a disorder of movement. Other common features include:
Depression
REM-sleep behavioural disorder
Autonomic dysfunction: constipation, urinary frequency
Anosmia
Dementia (late feature, typically older patients)
Introduction
Wash hands
Introduce yourself
Confirm the patient’s details (e.g. name and date of birth)
Explain the examination:
“Today I’m going to perform an examination which will involve me first of all having a general look at you and then asking you to do some movements.”
Gain consent:
“Does everything I’ve said make sense?”
“Do you have any questions?”
“Are you happy for me to go ahead with the examination?”
You may like to ask the patient to expose their hands, wrists and elbows (watch this process, it can provide clues)
Ask if the patient currently has any pain
General Inspection
Parkinson’s disease can be a spot diagnosis– a lot of information can be gained from watching the patient walk into the room and sit down in the chair (we will explore these signs in more detail in the formal assessment of gait).
When the patient is sitting, pay close attention to:
Spontaneous movements and hand gestures – reduced spontaneous movements
Eyeblink – slow/less frequent
Facial expression – expressionless (hypomimia)
Tremor – asymmetrical tremor at rest – see below
Fidgeting – decreased
Speech – soft, indistinct (hypophonia)
Posture – flexed/stooped
General inspection
Tremor
Observe tremor
A key, and easily observable sign, in Parkinson’s disease is a tremor, this is typically:
Resting
4-6 Hz
Asymmetric
Hands – small tremor in the index finger and thumb (‘pill-rolling’), but can involve the lips, chin and legs
Note if an obvious visible tremor is present – if not, distract the patient by asking them to close their eyes and count back from 20.
Postural tremor
Test for posturaltremor by asking the patient to raise their arms in front of their body and spread their fingers. Note: a resting tremor stops on initiation of movement. PD patients may have a re-emergent tremor that presents after a few seconds.
Action (kinetic) tremor
Test for action (kinetic) tremor by performing a finger-nose test – ask the patient to alternate between touching their nose with their finger and touching your finger.
Ensure the patient stretches their arm out fully
Slower movements can detect an action tremor more accurately
Keep your finger in a fixed position
Differential diagnoses
Important differentialdiagnoses of tremor are:
Essential tremor – fast, postural and kinetic, improves with rest, head and neck involvement
Dystonic tremor – task-specific or task exacerbated, flurries, thumb extension
Inspect for evidence of tremor
Finger to nose test
Bradykinesia
Defined as: General slowness and the paucity of movement.
Test with rapid alternating movements– as big and fast as possible. Use at least 10-20 repetitions for each movement with one limb at a time.
Movements to assess include:
Finger tapping – ask the patient to oppose their thumb and forefinger
Hand grip – ask the patient to make a fist and then open their hand wide
Pronation/Supination – ask the patient to pronate and supinate their hand rapidly
Toe tap – ask the patient to keep their heel on the ground and tap their toes
Look for:
Progressive reduction in speed
Progressive reduction in amplitude
Asymmetry
Slowness of initiation
Extra tests to include:
Writing a sentence and drawing a spiral – asymmetric progressive micrographia
Undoing and doing up buttons – difficulty with buttons (functional deficit)
Pronation/supination
Pronation/supination
Tone
People with Parkinson’s typically have increased muscle tone – a.k.a rigidity. This is not velocity dependent – constant opposition to any passive movement – or direction dependent.
Assess Tone
Perform a circular wrist movement while taking the weight of the patient’s arm – ask them to relax as much as possible (“let your arm be as floppy as possible while I take the weight”)
You can also perform circular elbow or ankle movements
Using an activation manoeuvre can accentuate subtle rigidity associated with early Parkinson’s – ask the patient to actively tap their thigh with their contralateral arm while you perform the movement.
Feel for:
Resistance to movement – sometimes referred to as lead pipe rigidity, although usually more subtle early on or if medicated
Cogwheel rigidity – resistance at several points in the movement. Due to tremor superimposed upon rigidity
Assess tone
Assess tone
Assess tone
Gait
Assess first the patient’s ability to stand from a seated position with arms across their chest.
Stand near and keep arm behind the patient to offer support if needed!
Ask them to walk up and down the room offering to walk with them if they seem unsteady.
Assess Gait
Initiation – slow to start walking (failure of gait ignition) and hesitancy
Step length – reduced stride length, short steps, each step may get progressively smaller as the patient attempts to retain balance (Festinant gait)
Heel strike – asymmetrical (only one heel strikes) or symmetrical shuffling gait
Arm swing – reduced arm swing on one side or both
Posture – flexed trunk and neck, flexed elbows
Tremor – resting tremor can be observed when the patient is distracted by walking
Turning – impaired balance on turning or hesitancy, due to postural instability
Pull test
Assess postural instability by performing the pull test.
Note: this may not be appropriate in an OSCE setting, so say to the examiner that you would like to perform this test.
To perform the pull test safely:
Ensure you are positioned closely behind the patient and between them and a wall (if the patient falls backwards you can support them while hitting the wall
Clearly explain the test – “I’m going to give you a quick tug on your shoulders and what I want you to do is to take one or two steps backwards to catch your balance. I will be behind you at all times and won’t let you fall.”
Perform a test by coaching and then tugging more gently
Quickly tug their shoulders backwards
If normal, patient corrects their balance in one or two quick steps
Assess gait
To complete the examination
Thank the patient
Wash your hands
Summarise your findings
Example summary
“Today I performed a neurological examination on this 75-year-old gentleman to assess for the presence of Parkinson’s disease. On general inspection, he has reduced facial expressions, reduced spontaneous movements in his arms and a soft voice. An asymmetrical tremor was noted in his left hand at rest, involving his forefinger and thumb, which was more apparent when the patient was distracted. A re-emergent tremor in his left hand was elicited upon extension of both arms. Asymmetric bradykinesia was detected on the left side with progressive slowness and amplitude of rapid alternating movements. Assessment of tone revealed rigidity in the left wrist, elbow and ankle. Observation of the patient’s gait showed a flexed neck and left arm, with a reduced arm swing and an absent heel strike on the left side. He had a short stride length and was hesitant when turning. These findings are consistent with clinical features of parkinsonism.”
A renalsystemexamination involves looking for clinical clues and signs related to end-stage renal disease (e.g. fistula, dialysis catheter, renal transplant), renal failure complications (e.g. fluid overload, uraemia), transplant immunosuppression side effects (e.g. tremor, striae, steroid facies) and possible cause of renal disease (e.g. diabetes, hypertension, polycystic kidney disease).
This guide provides a generic overview of the potential signs you may identify in a patient with renal disease. The commonest renal patients you’ll come across will be those with polycystic kidney disease, a kidney transplant and/or end-stage renal disease on dialysis.
Explain the procedure – “This will involve me looking at your hands, arms, face and stomach. I’d also like to have a feel and listen to your stomach with a stethoscope. This will require exposing the stomach area.”
Gain consent and consider a chaperone
Position the patient (initially supine at 45°)
Enquire about pain or other concerns prior to beginning the examination
General inspection
Around the bedside
Oxygen, IV drips, medications, haemodialysis machine, peritoneal dialysis machine
Urinary catheter, drains (e.g. nephrostomy)
Fluid chart
Capillary blood glucose machine – diabetes
Patient
Consciousness – altered consciousness level may be present in severe or end-stage renal disease
Nutritional/fluid status – look for evidence of cachexia due to protein-energy wasting (PEW), dehydration or fluid overload
Overt Cushingoid appearance – may be due to steroids for renal transplant immunosuppression or other conditions (e.g. minimal change glomerulonephritis)
May be due to excessive corticosteroid use (i.e. immunosuppression) or platelet dysfunction observed in uraemia
Inspect for obvious warts or skin cancers:
Associated with immunosuppression (i.e. renal transplant patients)
Inspect for an arteriovenous fistula in the wrist (radio-cephalic fistula) and antecubital fossa (brachio-cephalic or brachio-basilic fistula) or the presence of a synthetic PTFE graft in the antecubital fossa (now commonplace in haemodialysis):
Indicates requirement of haemodialysis
Look for needle marks indicating that the vascular access is being used
Palpate for thrill and auscultate for a bruit (both absent if the fistula is thrombosed or surgically ligated such as after renal transplantation)
Offer to measure blood pressure (not on the side of an AV fistula):
Elevated in hypertension, chronic kidney disease, transplant rejection or as a side effect to steroids, tacrolimus or ciclosporin for renal transplant immunosuppression
Rarely, pulsus paradoxus (change in BP >10mmHg during breathing) can occur due to uraemic cardiac tamponade (associated with low jugular venous pressure)
Lesions associated with immunosuppression – SCC, BCC, in sun-exposed areas or scars from their excision, gingivostomatitis (HSV) around the mouth
Cushingoid facial appearance:
May be due to steroids for renal transplant immunosuppression or treatment of glomerulonephritis.
Hypertrichosis:
Can occur in patients on ciclosporin for renal transplant immunosuppression
Hearing aid:
May suggest Alport’s syndrome
Eyes
Conjunctival pallor:
Anaemia due to chronic renal failure
Calcification of cornea (band keratopathy):
Rarely due to elevated blood phosphorus in renal failure
Periorbital oedema:
Can be seen in nephrotic syndrome
Inspect for conjunctival pallor
Mouth
Gingival hypertrophy:
A potential side-effect of immunosuppressants for renal transplant
Uraemic fetor (breath smelling like ammonia):
Occurs due to uraemia and is seen in end-stage renal disease
Neck
Assess jugular venous pressure (JVP)
1. Ensure the patient is positioned at 45°
2. Ask the patient to turn their head away from you
3. Observe the neck for the JVP – located inline with the sternocleidomastoid
4. Measure the JVP – number of centimetres from the sternal angle to the upper border of pulsation
A raised JVP may indicate – fluid overload, right ventricular failure, tricuspid regurgitation
Observe for a raised JVP
Assess for hepatojugular reflux
Other
Look for the presence of an indwelling dialysis catheter at the base of the neck or front of the chest wall.
Inspect for a small horizontal scar at the base of the neck:
It may be a parathyroidectomy scar (performed for renal hyperparathyroidism)
May have scars around the base of neck from previous dialysis catheters
Chest
Inspection
Obvious warts or skin cancers:
Can be caused by immunosuppression (i.e. in the context of renal transplant)
Excoriations:
Pruritus can indicate uraemia
Bruising:
May be due to steroids for renal transplant immunosuppression
Percuss
Dull area of percussion on the chest wall:
May occur if hypoalbuminaemia or fluid overload causes pleural effusion
Percuss the chest
Percuss the chest
Palpate
Palpate the apex beat:
Normally located in the 5th intercostal space in the mid-clavicular line
Palpate the apex beat with your fingers (placed horizontally across the chest)
Displacement may indicate fluid overload or heart failure
Palpate apex beat
Auscultate
Auscultate heart sounds:
Note any added sounds which may indicate heart failure and/or fluid overload
A friction rub may suggest uraemic pericarditis
Palpate carotid pulse to whilst auscultating
Auscultate over the mitral valve
Auscultate over the tricuspid valve
Auscultate over the pulmonary valve
Auscultate over the aortic valve
Repeat auscultation using the bell of the stethoscope
Auscultate over the carotid artery listening for radiation of an aortic stenosis murmur
Auscultate over the left sternal edge to better hear an aortic regurgitation murmur
Auscultate over the heart's apex for mitral murmurs
Auscultate into the axilla listening for radiation of mitral murmurs
Auscultate lung bases:
Bibasal crackles may suggest pulmonary oedema secondary to fluid overload
Vocal resonance may indicate a pleural effusion (e.g. nephrotic syndrome)
Auscultate lung bases
Abdomen
Inspection
Position the patient flat with their abdomen fully exposed. Look for striae associated with corticosteroid use or abdominal wall oedema associated with fluid overload.
Abdominal distension:
Intrabdominal masses (i.e. polycystic kidneys)
Ascites (i.e. nephrotic syndrome)
Indwelling peritoneal dialysis fluid (look for peritoneal dialysis catheter)
Scars:
Rutherford-Morrison (‘hockey-stick’) scar for renal transplant
Bilateral iliac fossae scars from a simultaneous pancreas-kidney transplant (for a patient with type 1 diabetes)
Peritoneal dialysis catheter insertion scar near the umbilicus
Nephrectomy scar in the flank
Lipodystrophy marks from insulin injections for diabetes
Other:
Tenckhoff catheter in situ for peritoneal dialysis
Nephrostomy tube(s) in situ
Inspect the abdomen
Abdominal surgical incision sites
Palpation
Light and deep abdominal palpation
Palpate the 9 abdominal regions lightly then deeply:
If a palpable mass is present, consider a polycystic kidney
A palpable mass and scar in the right or left iliac fossa is suggestive of renal transplant
Perform light abdominal palpation
Perform deep abdominal palpation
Ballot the kidneys
1. Place your left hand behind the patient’s back, at the right flank
2. Place your right hand just below the right costal margin in the right flank
3. Press your right hand’s fingers deep into the abdomen
4. At the same time press upwards with your left hand
5. Ask the patient to take a deep breath
6. You may feel the lower pole of the kidney moving inferiorly during inspiration
7. Repeat this process on the opposite side to assess the left kidney
If the kidney is palpable describe the size and consistency:
Bilaterally enlarged, ballotable kidneys can occur in polycystic kidney disease or amyloidosis
A unilaterally enlarged, ballotable kidney can be due to a renal tumour
Ballot the kidneys
Percussion
Shifting dullness
1. Percuss from the centre of the abdomen to the flank until dullness is noted
2. Keep your finger on the spot at which the percussion note became dull
3. Ask the patient to roll onto the opposite side to which you have detected the dullness
4. Keep the patient on their side for 30 seconds
5. Repeat your percussion in the same spot:
If fluid was present (ascites) then the area that was previously dull should now be resonant
If the flank is now resonant, percuss back to the midline, which if ascites is present, will now be dull (i.e. the dullness has shifted)
Assess for shifting dullness
Assess for shifting dullness
Auscultation
Auscultate for a renal bruit just above and lateral to umbilicus on both sides:
A bruit may indicate renal artery stenosis (a possible cause of hypertension or renal failure)
Auscultate for renal artery bruits
Other
Palpate for sacral and lower limb oedema:
May indicate fluid overload in nephrotic syndrome or glomerulonephritis or renal impairment
To complete this examination
Thank the patient
Allow them time to re-dress
Wash hands
Summarise findings
Suggest further assessments and investigations
Blood pressure – if not already performed (not on the side of the AV fistula)
Fundoscopy – to assess for the presence of hypertensive or diabetic retinopathy
Urinalysis– to screen for evidence of infection and to assess for haematuria/proteinuria associated with glomerular disease
24-hour urine collection – to assess various urinary compounds and the degree of proteinuria or spot urine protein-creatinine ratio or albumin-creatinine ratio
MSU – if a urinary tract infection is suspected
U&Es – to assess renal function
Bicarbonate – to check for acidaemia
Bone profile – to assess the levels of calcium, phosphate and PTH (secondary and tertiary hyperparathyroidism)
Paediatrics is full of respiratory presentations and thus, respiratoryexaminations. This guide provides an overview of how to perform a paediatric respiratory examination in an OSCE setting.
It is important to be flexible when examining a child, adjusting your approach whilst taking into consideration the patient’s age, personality and how unwell they are.
Be opportunistic in your examination – i.e. taking advantage of periods of quiet to listen to the chest, open mouth yawns or cries to look at the throat. Remember, parents and carers can also be a great asset – helping to explain the next step in the examination and position the child as you need them. Work as a team!
Introduceyourself to both the parents and the child
Explain what the respiratory examination will involve
Gain consent from the parents/carers and/or child before proceeding.
Today I’d like to perform a respiratory examination, which will involve observing your child, feeling their pulse and listening to their breathing with my stethoscope.
Are you happy for me to carry out the examination?
General Inspection
Appearance and Behaviour
Observe the child in their environment (e.g. waiting room, hospital bed) and take note of their appearance and behaviour:
Oxygen saturation monitor or oxygen cylinder – chronic lung disease
Tracheostomy – upper airway obstruction – each child in the UK should have a box of emergency tracheostomy equipment (often blue/red in colour) – see our tracheostomy overview guide
Medications
Note any medications by the bedside or in the patient’s room and consider what underlying diagnoses they may indicate:
Eczema – increased likelihood of asthma and hayfever (atopy)
Tremor – beta 2 agonist use (e.g. salbutamol)
Pulses
Radial pulse (femoral pulse in babies) – assess rate and rhythm
Face
Observe the child’s facialcomplexion and features, including their eyes, ears, nose, mouth and throat.
General
Nasal flaring/grunting – increased work of breathing
Micrognathia (undersized jaw) – associated with a wide range of genetic syndromes (e.g. Pierre Robin, Noonan, Marfan)
Eyes
Conjunctival pallor – anaemia
Ears
Hearing aids – primary ciliary dyskinesia
Mouth
Central cyanosis – bluish discolouration of the lips and/or the tongue – persistent pulmonary hypertension, bronchospasm, lower respiratory tract infection
Cleft palate
Tip: Ask the child to see how long their tongue is or how big their mouth is.
Nose
Deviated nasal septum
Nasal polyps – atopy, cystic fibrosis
Throat
Inspect the throat using a pentorch and tonguedepressor (this is often best left until the end of the examination of young children, as it is likely to upset them)
Place your hands on the child’s chest, inferior to the nipples
Gently wrap your fingers around either side of the chest
Bring your thumbs together in the midline, so that they touch
Observe the movement of your thumbs, they should move apart equally
If one of your thumbs moves less, this suggests reduced expansion on that side
Reduced expansion can be caused by lung collapse, pneumonia and restrictive lung disease
Palpate the apex beat
Palpate the cardiacapex, noting its position:
Normal position – 5th intercostal space, midclavicular line
Left displacement – cardiomegaly
Right displacement – dextrocardia, diaphragmatic hernia
Percussion
Warn the child before beginning percussion – ‘I’m going to play your chest like a drum!’
Perform percussion gently, comparing one side to the other.
Percussion is often not performed on younger children
Percussion technique
1. Place your non-dominant hand on the chest wall
2. Your middle finger should overlie the area you want to percuss (between ribs)
3. With your dominant hand’s middle finger, strike the middle phalanx of your non-dominant hand’s middle finger
4. The striking finger should be removed quickly, otherwise, you may muffle resulting percussion note
Types of percussion note
Resonant – this is a normal finding
Dullness – this suggests increased tissue density – consolidation, fluid, tumour, collapse
Stony dullness – this suggests the presence of a pleural effusion
Hyper-resonance – the opposite of dullness, suggestive of decreased tissue density – pneumothorax
Auscultation
Start by showing the child your stethoscope and demonstrate it on your own chest and/or on one of their toys to familiarise them with this piece of equipment.
Suggest listening to their chest, making sure the stethoscope diaphragm isn’t cold prior to it making contact with the child.
Auscultate the chest in a systematic manner:
Ask the child to take ‘big breaths’ – some abnormal sounds may be inaudible if taking shallow breaths
Auscultate each side of the chest in a symmetrical pattern, comparingside to side
Pay attention to the inspiratory and expiratory sounds at each placement
Note the quality and volume of breathsounds
Note any additional sounds
Repeatauscultation on the posterior aspect of the chest
Vesicular breath sounds
Low frequency, non-musical sound, barely audible at rest
A normal finding
Be aware that harsh breath sounds from the upper airway are readily transmitted to the upper chest in infants, which can be misinterpreted as abnormal added sounds.
Bronchial breath sounds
Higher pitched, harsh breath sounds
Normal to be heard over the trachea
If heard elsewhere, they are suggestive of consolidation
Length of inspiration and expiration is equal
Crackles
Coarse crackles – consolidation, pulmonary oedema
Fine crackles – pulmonary fibrosis
Wheeze
High pitched expiratory sound
Distal airway obstruction
Polyphonic – asthma
Monophonic – foreign body
Vocal resonance
Increased – consolidation
Reduced – effusion
Stridor
Harsh, low pitched inspiratory noise from upper airway obstruction
Pleural rub
Inflamed pleura secondary to pneumonia or pulmonary embolism
Reduced air entry
Pneumothorax
Consolidation
Asthma – severe
Pleural effusion
Diagram of areas to percuss and auscultate on the anterior chest (repeat on the posterior chest)
To Complete the Examination…
Ensure the child is re-dressed after the examination
Thank the child and/or parents
Explain your findings to the parents and/or child
Ask if the parents and/or child have any questions
Below is a non-exhaustive list of clinicalsyndromes which can be associated with respiratorysystempathology. The features of the syndrome relevant to the respiratory system are shown in bold.
DiGeorge Syndrome A constellation of signs and symptoms associated with defective development of the pharyngeal pouch system. Most cases are caused by a heterozygous chromosomal deletion at 22q11.2.
Hearing loss Cleft palate Micrognathia Hypoplastic malar
Recurrent chest infections
Laryngotracheoesophageal anomalies
Feeding/breathing difficulties
Down’s Syndrome A genetic disorder caused by the presence of all or part of a third copy of chromosome 21.
Epicanthic folds Brushfield spots Protruding tongue Low set ears
Recurrent chest infections
Persistent pulmonary hypertension
Fetal Alcohol Spectrum Disorder A range of effects that can occur in an individual who was prenatally exposed to alcohol.
Lissauer, T., Clayden, G., & Craft, A (2012). Illustrated textbook of paediatrics. Edinburgh: Mosby.
Robertson (2017). Paediatric Respiratory History and Examination. Royal Children’s Hospital Melbourne.[LINK] (Accessed 4 Mar 19)
Tasker, R. C., McClure, R. J. & Acerini, C. L. (2013). Oxford handbook of paediatrics. Oxford: Oxford University Press.
Taylor, Gfeller, & Ring (date unknown). Respiratory Examination. Learnpediatrics.com Narration. The University of British Columbia. [LINK](Accessed 4 Mar 2019)
Whitehouse & Ng (2019). Respiratory Examination Guide. MRCPCH Clinical Revision. Trainees Committee, London School of Paediatrics.[LINK] (Accessed 4 Mar 2019)
Photo credits
Rijksmuseum (2019). Portret van Johannes Kojo, en face. Adapted by Geeky Medics – Available at:[LINK] [Accessed 25 Mar. 2019].
A paediatricabdominalexamination is generally performed in one of three major clinical settings – as part of a routine clinical examination, in the assessment of an ‘acute abdomen’ or in cases of recurrent abdominal pain, distension or constipation.
Care must always be taken to make sure no undue pain or discomfort is caused to the child. Rapport and trust can be lost very quickly and further examination might then be impossible.
Tip: Ask the child to see how long their tongue is or how big their mouth is
A 5-day-old infant with noted jaundice and scleral icterus.2
Neck
Palpate the cervicallymphnodes
Palpatesupraclavicularlymphnodes
Lymphadenopathy may indicate infection (most commonly) or malignancy (e.g. Virchow’s node)
Expose The Abdomen
Ask the parent or child (if appropriate) to expose the child’s abdomen.
If possible, the child should lay on a bed at 45-degrees initially for inspection and then lay flat for the examination of the abdomen (however, this is often difficult to achieve in reality).
Spider naevi (may be noted on abdomen or chest) – chronic liver disease
Hernia – inguinal, umbilical
Drains/tubes/access – gastrostomy, central venous catheter, ileostomy, colostomy
Scars (see diagram below)
Tip: The abdomen is normally protuberant in toddlers and young children.
Examples of scar locations
Common surgical scars which may be found during the examination of a child’s abdomen.
1
Kocher’s incision
Biliary surgery (e.g. cholecystectomy) Hepatic surgery
2
Midline laparotomy (variable length)
Fundoplication Major abdominal surgery
3
Transverse upper abdominal incision
Repair of congenital diaphragmatic hernia Splenic surgery
4
Pyloromyotomy scar
Treatment of pyloric stenosis
5
Grid-Iron incisions at McBurney’s point
Appendicectomy
6
Umbilical/Sub-umbilical scars
Hernia repairs Gastroschisis repair Exomphalos
7
Point incision marks
Laparoscopy port sites Drain sites VP shunts
8
Inguinal incisions
Inguinal hernia repairs Vascular access scars
9
Lateral thoracolumbar incision
Renal surgery (nephrectomy)
10
‘Hockey-Stick’ scar
Renal transplant
Examine The Abdomen
Preparing to palpate the abdomen
Kneel down and/or raise the bed, your face is level with the child’s face.
Use warm hands, explain and relax the child.
Keep the parent close at hand.
Abdominal wall muscles must be relaxed for palpation to be effective. Ensure the child is lying down entirely flat, with their hand by their sides. Take away any pillows or cushions.
Expose the abdomen entirely, lower the trousers and underwear, cover the child with a sheet.
Light palpation
Perform lightpalpation of the 9 abdominal regions, whilst looking at the child’s face and assessing for rigidity,tenderness, guarding and palpablemasses.
Avoid mentioning to word “pain” or “hurt” (e.g. “Is this painful?” “Does that hurt?”) when examining young children, as this can often provoke fear and upset. Instead, observe the child’s body language and facial expressions to determine if they are in pain.
Guarding is suggestive of peritonitis and indicates the need for urgent surgical review.
Deep palpation
Repeat palpation of the 9 abdominal regions, this time applying greaterpressure to better assess intra-abdominal structures (continue to observe the child’s face for signs of discomfort).
If any masses are identified, determine their location, approximate size, shape, consistency and mobility.
Tenderness
Localised in appendicitis (RIF), hepatitis (RUQ) and pyelonephritis (flank).
Generalised in mesenteric adenitis and peritonitis.
Guarding
Pain on coughing, moving about/walking/bumps during a car journey suggests peritoneal irritation.
A child walking, whilst being flexed forwards suggests psoas irritation (e.g. appendicitis).
Incorporating play may be used to elicit more subtle guarding.
“Can you jump up and down?” – a child will not be able to jump on the spot if they have localised guarding
“Blow out your tummy as big as you can, then suck it in as far as you can” – this will elicit pain if there is peritoneal irritation
Abnormal masses
Wilm’s tumour – renal mass, sometimes visible, does NOT cross the midline
Neuroblastoma – irregular firm mass, may cross the midline, the child is usually very unwell
Faecal masses – mobile, non-tender, indentable, often in the LIF
Intussusception – acutely unwell, the mass may be palpable, most often in RUQ
Liver palpation
Palpatefrom the right iliac fossa and locate the edge of the liver with the tips or sides of your fingers (ask the child to take deep breaths if appropriate).
The liver edge may be soft or firm and you will be unable to get above it. The edge will move with respiration.
Measure in centimetres the extension of the liver edge below the costal margin in the mid-clavicular line.
Percussdownwards from the right lung to exclude downward displacement due to lung hyperinflation (i.e. in bronchiolitis).
Dullness to percussion can help delineate the upper and lower border. Record the span of the liver (in cm).
Tip: Young children may be more cooperative if you palpate first with their hand or by putting your hand on top of theirs.
Causes of hepatomegaly
There are several potential causes of hepatomegaly including:
Normal findings. The liver edge is 1–2 cm below the costal margin in infants and young children. The spleen may be 1–2 cm below the costal margin in infants 3
Splenic palpation
A palpable spleen is at least TWICE its normal size.
Palpate from the right iliac fossa towards the left upper quadrant (ask the child to take deep breaths if appropriate).
The edge is usually soft and you will be unable to get above it.
The splenic notch is occasionally palpable if markedly enlarged.
The spleen should move with respiration.
Measure the degree of extension below the costalmargin (in cm) in the mid-clavicular line.
Percuss to delineate the lower border (splenic tissue will be dull to percussion)
Causes of splenomegaly
There are several potential causes of splenomegaly including:
The kidneys are not usually palpable beyond the neonatal period unless they are enlarged or the abdominal muscles are hypotonic.
Palpate the kidneys by balloting bi-manually in each hypochondrium.
You can ‘get above them’ (unlike the spleen or liver).
Tenderness implies inflammation.
Unilaterally large – hydronephrosis, cyst or tumour
Bilaterally large – hydronephrosis, kidney stones, polycystic kidneys
Ascites
Ascites may be present in cirrhosis, hypoalbuminaemia, infection or malignancy.
The presence of shifting dullness is highly suggestive of ascites
Assessing for shifting dullness
It is usually not possible to formally assess for shiftingdullness in young children, due to issues with co-operation. However, in older children, it may be possible.
1. Percuss from the centre of the abdomen to the flank until dullness is noted
2. Keep your finger on the spot at which the percussion note became dull
3. Ask the patient to roll onto the opposite side to which you have detected the dullness
4. Keep the patient on their side for 30 seconds
5. Repeat your percussion in the same spot
6. If fluid was present (ascites)then the area that was previously dull should now be resonant
7. If the flank is now resonant, percuss back to the midline, which if ascites is present, will now be dull (i.e. the dullness has shifted)
Auscultation
Start by showing the child your stethoscope and demonstrate it on your own abdomen and/or on one of their toys to familiarise them with this piece of equipment.
Suggest listening to their abdomen, making sure the stethoscope diaphragm isn’t cold prior to it making contact with the child.
Perform auscultation of the abdomen, listening for
Normal bowel sounds – should occur a minimum of every 2 minutes
‘Tinkling’ bowel sounds – obstruction
Absent bowel sounds – peritonitis/ileus
Genital examination
A genital examination is often performed routinely in infants and young children, however in older children or teenagers it should only be performed if relevant (i.e. vaginal discharge, suspicion of inguinal hernia or perineal rash).
Male genital examination
Ensure normal penile and scrotaldevelopment
Assess for penile abnormalities – hypospadias, chordee
Assess for descended tests – with one hand over the inguinal region, palpate the testicles with the other hand (record if testis descended, retractile or impalpable)
Note any scrotal swelling – hydrocele, hernia
Female genital examination
Confirm the externalgenitalia look normal
Rectal examination
Not routinely performed and if indicated, it should be performed by a specialist who has experience interpreting findings
Confirm the anus looks normal and perforate
Anal skin tags (Crohn’s)
Anal prolapse
Staining of underwear (may suggest constipation)
Lower limbs
Inspect for ankle oedema (nephrotic syndrome/liver disease)
To Complete the Examination…
Ensure the child is re-dressed after the examination
Thank the child and/or parents
Explain your findings to the parents and/or child
Ask if the parents and/or child have any questions
Caused by loss of part or all of an X chromosome, affecting only females.
Short stature Delayed puberty Webbed neck Shield chest Horseshoekidney
Williams syndrome
Caused by the deletion of genetic material from a specific region of chromosome 7.
Short palpebral fissures Upturned nose Cupid bow lip Nephrocalcinosis
Alagille syndrome
In 90 percent of cases, caused by mutations in the JAG1 gene.
Broad forehead Small chin Flat face Biliary atresia Jaundice
Thalassaemia
A group of disorders in which the normal ratio of alpha-globin to beta-globin production is disrupted due to a disease-causing variant in one or more of the globin genes.
Enlarged cheekbones Enlarged forehead Bone deformity Massive splenomegaly
Glycogen storage disorder
A glycogen storage disease is a metabolic disorder caused by enzyme deficiencies affecting either glycogen synthesis, glycogen breakdown or glycolysis, typically in muscles and/or liver cells.
Myopathy/weakness Hepatosplenomegaly
Beckwith-Wiedemann syndrome
An overgrowth disorder involving a predisposition to tumour development.
Lissauer, T., Clayden, G., & Craft, A. (2012). Illustrated textbook of paediatrics. Edinburgh: Mosby.
Miin Lee & Fawbert (2014). Abdominal Examination Guide. MRCPCH Clinical Revision. Trainees Committee, London School of Paediatrics [LINK] (Accessed 22 Mar 2019)
Paeds.co.uk (2009) Surgical Scars – Abdomen. Paeds.co.uk the online paediatrician’s encyclopaedia. [LINK] (Accessed 4 Mar 2019)
Tasker, R. C., McClure, R. J. & Acerini, C. L. (2013). Oxford handbook of paediatrics. Oxford: Oxford University Press.
The paediatriccardiovascularexam can be a logistical minefield, requiring a good understanding of cardiac anatomy and possible congenital anomalies. With babies especially, it’s important to be opportunistic with your examination – doing the three ‘quiet things’ first: auscultation of heart sounds, auscultation of breath sounds and palpation of femoral pulses.
With all children, don’t expect to follow a pre-defined order. Be creative and playful, making the examination into a game involving parents, siblings and the toys available to you.
Introduce yourself to both the parents and the child
Explain what the cardiovascular examination will involve
Gain consent from the parents/carers and/or child before proceeding.
Today I’d like to perform an examination of your child’s heart, which will involve first watching your child, then feeling their pulse and listening to their chest with my stethoscope.
Are you happy for me to carry out the examination?
General Inspection
Appearance and Behaviour
Observe the child in their environment (e.g. waiting room, hospital bed) and take note of their appearance and behaviour:
How alert is the child?
How active is the child?
Do they appear to be a normal colour? (e.g. Is there any pallor, cyanosis or jaundice?)
Do they have an obvious rash?
Do they appear a healthy weight
Pay attention to features that may indicate the presence of an underlying geneticcondition:
Stature (e.g. tall/short)
Syndromic facial features
See the end of this guide for a non-exhaustive list of clinical syndromes which can be associated with cardiovascular system pathology.
Equipment
Observe for any equipment in the patient’s immediate surroundings and consider why this might be relevant to the cardiovascular system:
O2 saturation probe and monitor
Oxygen mask, nasal prongs, oxygen tank and other breathing support
Intravenous medication
Wheelchair
Medications
Note any medications by the bedside or in the patient’s room and consider what underlying diagnoses they may indicate:
4. Pacemaker or implantable cardioverter-defibrillator scar
5. Chest drain scars
Palpation
Start with the abdomen and then work up to the chest. If appropriate, ask the child what they ate for their last meal and try to ‘find it’. If you can’t ‘find it’, you’ll have to listen – leading you to auscultation (sneaky right?).
Abdomen
Liver
In a healthy child, the liveredge may be palpated up to 2cm below the costal margin. If the liver edge is more prominent, it would suggest the presence of hepatomegaly. Heart failure is a potential cause of hepatomegaly.
1. Begin palpation in the right iliac fossa using the flat edge of your hand (radial side of your right index finger)
2. Press your hand into the abdomen as the child breathes in
3. Feel for a step, as the liver edge passes below your hand
4. If you don’t feel anything, repeat the process with your hand 1-2 cm higher
If you feel the liver edge, note the following:
The degree of extension below the costal margin
The consistency of the liver edge (smooth/irregular)
Tenderness – suggestive of hepatitis
Pulsatility – a pulsatile enlarged liver can be caused by tricuspid regurgitation
Spleen
If hepatomegaly is present, you should also assess for splenomegaly. See the paediatricabdominalexamination guide for details on how to perform splenic palpation.
Chest
Palpate the apex beat
Palpate the cardiac apex, noting its position.
Normal position:
<7 years old: 4th intercostal space, to the left of the midclavicular line
>7 years old: 5th intercostal space, midclavicular line
Abnormal position:
Left displacement – cardiomegaly, pectus excavatum, scoliosis
Right displacement – dextrocardia, left diaphragmatic hernia, collapsed lung on right, left pleural effusion, left pneumothorax
Assess for heaves and thrills
Heaves:
A parasternalheave is a precordial impulse that can be palpated
Parasternal heaves are present in patients with rightventricularhypertrophy
Place the heel of yourhand parallel to the leftsternaledge (fingers vertical) to palpate for heaves
If heaves are present you should feel the heel of your hand being lifted with each systole
Tip: Instead of the heel of your hand, use your fingertips with babies and younger children
Thrills:
A thrill is a palpablevibration caused by turbulentbloodflow through a heartvalve (the thrill is a palpable murmur)
You should assess for a thrill across each of the heartvalves in turn
To do this place your hand horizontally across the chestwall, with the flats of your fingers and palm over the valve to be assessed
Auscultation
Auscultate the heart
Start by showing the child your stethoscope and demonstrate it on your own chest and/or on one of their toys to familiarise them with this piece of equipment.
Suggest listening to their chest, making sure the stethoscope diaphragm isn’t cold prior to it making contact with the child.
Tip: Play a game to see who can stay quiet the longest – involve the parents!
Areas of the heart to auscultate
Auscultate ‘upwards’ through the valve areas using the diaphragm of the stethoscope:
Mitral valve – 5th intercostal space – midclavicular line (apex beat)
Tricuspid valve– 4th or 5th intercostal space – lower left sternal edge
Pulmonary valve– 2nd intercostal space – left sternal edge
Aortic valve– 2nd intercostal space – right sternal edge
Listen over each area with both the bell (for low pitched sounds – gallops and split S2) and the diaphragm (high pitched sounds – pericardial rubs, S1/S2 and most murmurs).
Tip: Complex cardiac anomalies may cause you to hear multiple dynamic murmurs (e.g. Tetralogy of Fallot)
Auscultate the lungs
Ask the child to take ‘big breaths’ – some abnormal sounds may be inaudible if taking shallow breaths
Auscultate each side of the chest in a symmetrical pattern, comparingside to side
Pay attention to the inspiratory and expiratory sounds at each placement
Note the quality and volume of breathsounds
Note any additional sounds
Repeatauscultation on the posterior aspect of the chest
Coarse bibasal crackles may be a late sign of pulmonary congestion secondary to congestive heart failure.
Areas of the anterior chest to auscultate
To Complete the Examination…
Assess for oedema
Ask the parents if the child looks puffy or swollen.
Inspect the limbs, sacral area and face – affected areas will depend on the age of the child and mobility status.
Peripheral oedema often occurs in right-sided heart failure.
Final steps
Ensure the child is re-dressed after the examination
Thank the child and/or parents
Explain your findings to the parents and/or child
Ask if the parents and/or child have any questions
More than 50% of children will have a murmur at some point while congenital heart disease is present in less than 1% of children. The table below includes a non-exhaustive list of murmur characteristics and underlying causes.
LOCATION
Aortic area – aortic stenosis
Pulmonary area:
Ejection systolic with fixed P2 – atrial septal defect;
Ejection systolic without fixed P2 – pulmonary stenosis (radiates to axilla/back, louder on inspiration)
Apex – mitral regurgitation – increases on lying on left, radiates to the axilla
TIMING
Systolic
Diastolic
Continuous
DURATION
Mid-systolic (ejection)
Pan-systolic
LOUDNESS (systolic murmur grade)
1-2: Soft, difficult to hear
3: Easily audible, no thrill
4-6: Loud, with a thrill
SITE OF MAXIMAL INTENSITY
Mitral
Pulmonary
Aortic
Tricuspid area
RADIATION
To the neck: aortic stenosis
To the back: coarctation of the aorta or pulmonary stenosis
To the axilla: mitral regurgitation (increases lying on the left)
Syndromes that may impact the cardiovascular system
Below is a table containing a non-exhaustive list of syndromes that can impact the cardiovascular system.
The features of each syndrome relevant to the cardiovascular system are shown in bold.
Alagille syndrome In 90 percent of cases, caused by mutations in the JAG1 gene.
Broad forehead
Small chin
Flat face
Pulmonary stenosis
Tetralogy of Fallot
CHARGE syndrome
CHARGE syndrome is a genetic syndrome with a characteristic set of features.
Coloboma (of the eye)
Choanal atresia
Heart anomalies (see below)
Tetralogy of Fallot
Patent ductus arteriosus
Ventricular septal defect
Atrial septal defect
Atrioventricular septal defect
DiGeorge syndrome A constellation of signs and symptoms associated with defective development of the pharyngeal pouch system. Most cases are caused by a heterozygous chromosomal deletion at 22q11.2.
Hearing loss
Cleft palate
Micrognathia
Hypoplastic malar
Ventricular septal defect
Tetralogy of Fallot
Interrupted aortic arch
Down syndrome A genetic disorder caused by the presence of all or part of a third copy of chromosome 21.
Epicanthic folds
Brushfield spots
Protruding tongue
Low set ears
Ventricular septal defect
Atrial septal defect
Atrioventricular septal defect
Fetal alcohol spectrum disorder A range of effects that can occur in an individual who was prenatally exposed to alcohol.
Macrocephaly
IUGR
Smooth philtrum
Joint abnormality
Ventricular septal defect
Atrial septal defect
Fragile X syndrome An X-linked disorder and the most common inherited cause of intellectual disability: Both males and females can be affected.
Macrocephaly
Prominent ears and jaw
Hypermobility
Macroorchidism
Mitral valve prolapse
Marfan syndrome An autosomal dominant connective tissue disorder.
Marfanoid habitus (tall, long limbs)
Hypermobility
Arachnodactyly
Chest wall deformities
Aortic dilatation/regurgitation
Mitral prolapse
Noonan syndrome An autosomal dominant condition. 50% of children have a pathogenic variant in protein tyrosine phosphatase, nonreceptor type 11 (PTPN11).
Turner phenotype
Pulmonary stenosis
Hypertrophic cardiomyopathy
Turner syndrome Caused by loss of part or all of an X chromosome – affecting only females.
Short stature
Delayed puberty
Webbed neck
Shield chest
Coarctation of the aorta
Aortic stenosis
Williams syndrome Caused by the deletion of genetic material from a specific region of chromosome 7.
Short palpebral fissures
Upturned nose
Cupid bow lip
Supravalvular aortic stenosis
Pulmonary stenosis
Reviewer
Dr Sunil Bhopal
Senior Paediatric Registrar
References
Bishop (2011). Cardiac Examination. Learnpediatrics.com Narration. The University of British Columbia. [LINK] (Accessed 18 Mar 2019)
Lissauer, T., Clayden, G., & Craft, A. (2012). Illustrated textbook of paediatrics. Edinburgh: Mosby.
Miin Lee (2013). Cardiovascular Examination Guide. MRCPCH Clinical Revision. Trainees Committee, London School of Paediatrics. [LINK] (Accessed 18 Mar 2019)
Tasker, R. C., McClure, R. J. & Acerini, C. L. (2013). Oxford handbook of paediatrics. Oxford: Oxford University Press.
Towers, A (2015). Examination: cardiovascular, Don’t Forget the Bubbles. [LINK](Accessed 18 Mar 2019)
Photo credits
Ragesoss, Physical exam of a child with stethoscope on the chest, Colour, CC BY-SA 3.0. Available at: [LINK]
Examining the neurologicalsystem is different in young children compared with older children and adults. The components of the complete exam are extensive and usually cannot be performed in a classical fashion. This approach may be carried out on a cooperative school-aged child – but always be mindful of keeping the examination fun.
Observation is key. Make the most of every opportunity to examine the child. See how they play, taking into account handedness and motor deficits. These observations, especially in younger children, will ultimately give you the best insight into their daily functioning and paint a broad picture of their neurological function.
Tips include:
Using items such as a tennis ball, small toys (including a toy car), bells, bubbles and an object that will attract the child’s attention (like a pinwheel).
Be mindful to postpone uncomfortable tasks until the end, such as head circumference, fundoscopy and sensory testing.
Introduce yourself to both the parents and the child
Explain what the neurological examination will involve
Gain consent from the parents/carers and/or child before proceeding.
Today I’d like to perform a neurological examination, which will involve me testing the nerves that supply different parts of the body.
Are you happy for me to carry out the examination?
General Inspection
With toddlers – the initial phase of observation is best done with the child in the parent’s lap. Through minimising apprehension, assessment of higher cortical function, muscle tone and tendon reflexes becomes easier.
Testing in infants is often by observation for specific movements and responses, which is ultimately less reliable. In older children, it may be possible to formally assess at least some cranial nerves, however, this very much depends on the exact age of the child, their current state and the environment. We have provided a guide to each of the cranial nerves below, however, it is unlikely you will be able to carry out a complete neurological assessment in one sitting with most children.
Olfactory nerve (I)
The olfactorynerve is responsible for the sense of smell.
Assessment
Test the ability to detect a smell with eyes closed (i.e. chocolate).
This is not checked in small children or infants.
Olfaction can be impaired after closed head injury and in infants with arhinencephaly-holoprosencephaly.
Optic Nerve (II)
The opticnerve is responsible for vision and afferentpupillarylightreflexes
Testing visual acuity
Infant – observe the infant reach for objects of varying size
>6 months old – observe reaching for scraps of paper less than 5mm in size when placed on a dark background
Older children – standard recognition of letters, numbers or shapes on a Snellen chart (see our guide to visual assessment)
Visual fields
Introduce objects into the peripheral field of vision as the child focuses on an object held directly in front of them.
Note if the child becomes aware of the peripheral object (e.g. turning head towards it).
Pupillary reflexes
To best see pupillary reflexes the room should be dimlylit.
Direct pupillary reflex (afferent CN II, efferent CN III):
Shine a light into the pupil and observe constriction of that pupil.
Sluggish reaction or lack of constriction may suggest pathology (optic nerve, brainstem, drugs)
Consensual pupillary reflex:
Again shine a light into the pupil, but this time observe the contralateral pupil.
A normal consensual response involves the contralateral pupil constricting.
Lack of a normal consensual response may suggest damage to one/ both optic nerves or damage to the Edinger-Westphal nucleus
Fundoscopy
Often difficult, requiring patience. If in doubt, it is often best to arrange for a specialist to do this examination using equipment designed specifically for children.
Assess for red reflex:
Position yourself at a distance of around 30cm from the child’s eyes.
Looking through the ophthalmoscope and ensure the light is directed into the pupil. Observe for a reddish/orange reflection in the pupil.
An absent red reflex may indicate the presence of cataract, or in rare circumstances neuroblastoma.
Move in closer and examine the eye with the ophthalmoscope::
1. Move in closer whilst maintaining the red reflex and examine the retina with the ophthalmoscope. You may need to change the focus wheel to account for the difference in glasses prescription between the child and yourself. Approach from an angle slightly temporal to the child.
2. Begin by identifying a blood vessel and then follow the branching of this blood vessel towards the optic disc (the branches point like arrows towards the optic disc).
3. Assess the optic disc (colour/margin/cupping).
4. Assess the retinal vessels for pathology (e.g. arteriovenous nipping/neovascularization/haemorrhages).
5. Finally, assess the macula by asking the patient to look directly into the light:
Drusen are typically noted in macular degeneration
A cherry-red spot is typically noted in central retinal artery occlusion
Oculomotor, Trochlear & Abducens nerves (III, IV, VI)
Functions of CNII, CNIV and CNVI
III: Eyelid elevation, eye elevation, ADduction, depression in ABduction, efferent to pupil
IV: Depression in ADduction
VI: Eye abduction
Inspect for ptosis
Look for evidence of eyelid asymmetry suggestive of ptosis
Causes include sympathetic paralysis from lesions of cranial nerve III, Horner’s syndrome, myopathies, myasthenia gravis and structural eye lesions (e.g. neurofibroma).
Assess extraocular eye movements
Test horizontal, vertical and oblique planes of eye movement (drawing an imaginary “H” and asking the child to “follow my finger” achieves this)
Tested by assessing the child’s ability to track brightly coloured soft toy or soft light
Abnormal eye movement findings:
Down and out – paralysis of the inferior oblique muscle (III)
Laterally – paralysis of medial rectus (III)
Upwards – paralysis of inferior rectus (III)
Down and inwards – paralysis of superior rectus (III)
Upwards and out – paralysis of superior oblique (IV)
Inwards – paralysis of lateral rectus (VI)
Opsoclonus: Occult neuroblastoma – chaotic bursts of eye movements, often associated with myoclonus
Up gaze paresis: Parinaud syndrome
Impaired down gaze: Niemann Pick Type C disease
Oculomotor apraxia: Delayed initiation of eye movement and jerky pursuit movements. Seen in Joubert syndrome or oculomotor apraxia-ataxia syndrome.
Trigeminal nerve (V)
The trigeminalnerve provides facial and cornealsensation, in addition to motor innervation to the muscles of mastication.
Assess sensory function
Assess response to light touch over the 3 divisions of the face using a piece of cotton wool
In a baby, the presence of the rooting reflex confirms intact facial sensation
Assess the corneal reflex (afferent V, efferent VII) – this is rarely performed in practice
Assess motor function
Ask the child to open their mouth against resistance
Jaw jerk reflex (tests sensory and motor function) – rarely performed
Facial nerve (VII)
The facialnerve provides motorinnervation to the muscles of facialexpression and is also involved in tastesensation.
Inspection
Inspect the child’s face for asymmetry
Compare the nasolabial folds to identify subtle asymmetry
Assess motor function
It is difficult to formally assess the power of the facial muscles, particularly in children.
Instead, observe their facial expressions for any asymmetry (e.g. when smiling, crying etc)
In older children, you may be able to ask them to copy your facial expressions (e.g. blowing out your cheeks, showing teeth, screwing up eyes, wrinkling forehead)
Vestibulocochlear nerve (VII)
The vestibulocochlearnerve is responsible for balance and hearing.
Assessment
Infants: Make a soft sound close to the ear (i.e. rustling of paper). The child should show an ‘alerting response’.
>5-6 months: Localise the sound to a specific quadrant.
School-age children: Softly whispering a number approximately 30 cm from the ear. Rinne and Weber’s can also be used.
Vestibular function: Poor head control, truncal unsteadiness, gait ataxia, nausea, vomiting and horizontal nystagmus may indicate vestibular system dysfunction.
The glossopharyngeal (IX) and vagus (X) nerves have various functions including:
IX: Sensation from soft palate, taste fibres
X: Palatal movement, vocal cords, cough
Assessment
Observe the child swallowing:
Observe the child drinking or eating
Dysfunction swallowing may present with salivary drooling, pooling of saliva and coughing during feeding
Observe the movement of the soft palate:
Observe the uvula and ask the child to say “AAH” (if possible)
Unilateral CNX lesions result in deviation of the uvula to the side contralateral to the lesion
Listen to the child’s voice:
Hoarseness may be due to unilateral dysfunction of the recurrent laryngeal nerve (X)
Bilateral dysfunction results in a bovine cough
Gag reflex
Assesses both the afferent pathway of CN IX and efferent pathway of CN X
Be aware of this test, however, it is rarely performed in practice
Accessory nerve (XI)
The accessory nerve provides motor innervation to the trapezius and sternocleidomastoid muscles, which assist with head-turning and shoulder shrugging.
Assessment
Test elevation of shoulders:
If the child is old enough, ask them to scrunch their shoulders up towards their ears (demonstrate for them)
Test turning the neck against resistance:
If the child is old enough, ask them to look over their shoulder whilst you observe the sternocleidomastoid muscle
Small child: When supine, gently push the head laterally while supporting the shoulder.
Hypoglossal nerve (XII)
The hypoglossalnerve is responsible for the movement of the tongue.
Assessment
Inspect the tongue when inside the mouth for fasciculations
Ask the child to stick out their tongue – unilateral lesion results in deviation of the tongue to the affected side
Check whether the tongue can be equally protruded on both sides
Upper and Lower Limb Examination
This portion of the examination requires an assessment of muscle tone, strength,reflexes and sensation of the upper and lower limbs.
Upper motor neuron (UMN) lesions
Lesions result in loss of muscle strength and dexterity distal to the injury, hypertonia and hyperreflexia.
Due to the corticospinal tract crossing at the pyramidal decussation, UMN lesions will present with contralateral deficits for lesions above the pyramids and ipsilateral defects for lesions of the spinal cord.
Spinal cord lesions will also present with LMN findings at the level of the injury due to damage to the ventral root or ventral nerve at that level.
Lower motor neuron (LMN) lesions
Lesions result in muscle fasciculations and atrophy, loss of strength, decreased tone and absent deep tendon reflexes.
Inspection
Begin by inspecting the limbs for symmetry, muscle bulk and posture.
Look for any evidence of abnormalities:
Asymmetry at rest in infants – may suggest hemiparesis
Opisthotonus – persistent arching of the neck and trunk due to bilateral cerebral cortical dysfunction
Abducted hips or ‘frog-legged’ posture – hypotonia
Making a fist with the hand or holding the thumb adducted across the palm during quiet wakefulness – suggesting corticospinal tract involvement
Tremor – rhythmic, fine amplitude flexion-extension movements of the distal extremity
Myoclonus – quick, non-stereotyped jerks around a segment of the body
Athetosis – slow, sinuous movement of the distal extremity with pronation of the distal extremity
Chorea – rapid, quasi-purposive, non-stereotyped movements of a segment of the body that is generally proximal
Tics – highly stereotyped and repetitive movements
Muscle atrophy – may be segmental or generalised – neuropathy, myopathy or disuse
Pseudohypertrophy – bulky appearance of muscle with associated weakness
Fasciculations – ripple-like movements of the muscles that accompany degeneration of anterior horn cells
Stereotyped hand wringing movements and bruxism – may be seen in Rett syndrome
Muscle tone
Muscle tone is assessed by passively taking the limb through a range of motion – including the shoulder, elbow and wrist bilaterally in the upper limb and the hip, knee and ankle bilaterally in the lower limb.
Spasticity
Felt as an increase in tone varying with the force applied and the velocity of movement
Often considered ‘clasp knife’ and tends to accompany pyramidal tract lesions
Rigidity
Increased tone that does not vary with velocity or position
Suggests an extrapyramidal lesion
Clonus
Position the child’s leg so that the knee and ankle are slightly flexed, supporting the leg with your hand under their knee, so they can relax.
Rapidly dorsiflex and partially evert the foot
Keep the foot in this position
Clonus is felt as rhythmical beats of dorsiflexion/plantarflexion (>5 is abnormal)
Sustained clonus is abnormal at all ages
Power
Much of this assessment may not be possible in the majority of young children, however, we have provided it for older children who are capable of following instructions.
The assessment of muscle power in young children is less formal and involves comparing the strength of their natural movements between sides.
The MRC scale for muscle power is used to formally score the strength of particular muscle groups, however, it is less useful in the context of young children and therefore we have not included details.
Upper limb power
Assess power one side at a time and compare like for like.
Remember to stabilise and isolate the joint when testing.
The following are a test of some of the main movements of the upper limbs, sufficient to show most pathology.
Shoulders:
ABduction (C5) – “Don’t let me push your shoulders down”
ADduction (C6/7)– “Don’t let me pull your arms away from your sides”
Elbow:
Flexion(C5/6) – “Don’t let me pull your arm away from you”
Extension(C7) –“Don’t let me push your arm towards you”
Wrist:
Extension (C6) – “Cock your wrists back and don’t let me pull them down”
Flexion (C6/7) – “Point your wrists downwards and don’t let me pull them up”
Fingers:
Finger extension (C7) – “Put your fingers out straight and don’t let me push them down”
Finger ABduction (T1) – “Splay your fingers and don’t let me push them together”
Thumb ABduction (C8/T1) – “Point your thumbs to the ceiling and don’t let me push them down”
Lower limb power
Assess one side at a time and compare like for like.
Remember to stabilise the joint whilst testing power.
Hip:
Flexion (L1/2) – “raise your leg off the bed and stop me from pushing it down”
Extension (L5/S1) – “stop me from lifting your leg off the bed”
ABduction (L4/5) – “push your legs out”
ADduction (L2/3) – “squeeze your legs in”
Knee:
Flexion (S1) –“bend your knee and stop me from straightening it”
Extension (L3/4) – “kick out your leg”
Ankle:
Dorsiflexion (L4) – “keep your legs flat on the bed…cock your foot up towards your face…don’t let me push it down “
Plantarflexion (S1/2) –“push down like on a pedal”
Inversion (L4) – “push your foot in against my hand”
Eversion (L5/S1) – “push your foot out against my hand”
Big toe:
Extension(L5) – “don’t let me push your big toe down”
Reflexes
Upper limb reflexes
For each of the reflexes, ensure the child’s upper limb is completely relaxed
Hold the tendon hammer at the end of the handle and allow gravity to aid a good swing onto your finger.
If a reflex appears absent: make sure the child is fully relaxed and then perform a reinforcement manoeuvre – ask the child to clench their teeth together, whilst you hit the tendon.
1. Biceps reflex (C5/6) – located in the antecubital fossa
2. Triceps reflex (C7) – place forearm rested at 90º flexion – tap your finger overlying the triceps tendon
3. Supinator reflex (C6) – located 4 inches proximal to the base of the thumb
Lower limb reflexes
1. Knee jerk (L3/4)
2. Ankle jerk (L5/S1)
3. Plantar reflex (S1):
Run a blunt object along the lateral edge of the sole of the foot, moving towards the little toe, then medially under the toes
Observe the great toe
Normal result = Flexion of the great toe and flexion of the other toes
Abnormal (Babinski sign) = Extension of the great toe and spread of the other toes – upper motor neuron lesion
Sensation
Sensory information is carried by 2 major pathways and should be tested systematically through examining Touch, Pain, Temperature, Vibration and Proprioception in the upper limb and lower limb.
It’s easy to get bogged down in examining sensation. Check at least one modality each from the dorsal columns and spinothalamic tracts. Demonstrate normal sensation on the child’s sternum and ask them if it feels the same on the limb.
Much of the detailed assessment below is not possible in younger children and therefore gross assessment of sensation should be adopted.
Light touch sensation
Light touch sensation assesses the dorsal/posterior columns and spinothalamic tracts.
1. Touch the child’s sternum with the wisp of cotton wool to confirm they can feel it
2. Ask the child to say yes when they are touched
3. Using the wisp of cotton wool, gently touch the skin
4. Assess each of the dermatomes of the upper and lower limbs
5. Compare left to right, by asking the child if it feels the same on both sides
Pin-prick sensation
Pink-prick sensation assesses the spinothalamic tracts.
Repeat the previous assessment steps, but this time using the sharp end of a neuro-tip.
If loss of sensation is noted distally, test for “glove” distribution of sensory loss (peripheral neuropathy) by moving distal to proximal.
Vibration sensation
Vibration sensation assesses the dorsal/posterior columns.
1. Ask the child to close their eyes
2. Tap a 128 Hz tuning fork
3. Place onto the child’s sternum and confirm they can feel it buzzing
4. Place onto the distal interphalangeal joint of the forefinger/distal phalanx of the great toe and ask them if they can feel it buzzing
5. If vibration sensation is impaired, continue to assess the bony prominence of more proximal joints (interphalangeal joint of thumb → carpometacarpal joint of thumb → elbow → shoulder)
Proprioception
Proprioception assesses the dorsal/posterior columns.
1. Hold the distal phalanx of the thumb/great toe by its sides
2. Demonstrate movement of the thumb/great toe “upwards” and “downwards” to the child (whilst they watch)
3. Then ask the child to close their eyes and state if you are moving the thumb/great toe up or down
4. If the child is unable to correctly identify the direction of movement, move to a more proximal joint (finger > wrist > elbow > shoulder)
Dermatome map
Gait
Observe the child walking (if able) – posture, arm swing, stride length, speed, symmetry, balance and abnormal movements
Some common types of gait abnormality to observe for:
Ataxic: broad-based and unsteady. As if drunk. From cerebellar pathology or sensory ataxia. Often won’t be able to tandem gait either. With sensory ataxia, the child will watch their feet intently to compensate for proprioceptive loss. In a cerebellar lesion, they may veer to one side.
High-stepping: (either unilateral or bilateral) caused by foot drop (weakness of ankle dorsiflexion). Also won’t be able to walk on their heel(s).
Waddling gait: shoulders sway from side to side, legs lifted off ground with the aid of tilting the trunk. Caused by proximal lower limb weakness (e.g. myopathy).
Hemiparetic: one leg held stiffly and swings round in an arc with each stride (circumduction).
Spastic paraparesis: similar to above but bilateral – both are stiff and circumducting. Feet may be inverted and “scissor”.
Cerebellar Examination
Cerebellarfunction should be assessed as part of a complete neurological examination.
If the child is unable to follow instructions – noting how a child reaches for and manipulates toys can be used as a crude assessment of coordination.
Has the child met appropriate developmental milestones?
Careful questioning of parents – a history of loss or plateauing of developmental milestones is a red flag that should be investigated in greater detail.
The mini-mental state examination (MMSE) may be used, with modifications available for children of different ages/stages (e.g. MMSPE for preschool-aged children).
To Complete the Examination…
Ensure the child is re-dressed after the examination
Thank the child and/or parents
Explain your findings to the parents and/or child
Ask if the parents and/or child have any questions
Wash your hands
Further clinical assessments to consider
Skin assessment – both the skin and the nervous system develop from ectoderm during embryogenesis, so dermatological findings can sometimes relate to underlying neurological disease (e.g. Café au lait spots in neurofibromatosis and Ash-leaf spots in tuberous sclerosis)
Assessment of the back – scoliosis or a patch of hair which may indicate an undetected vertebral anomaly (e.g. spina bifida)
Cardiovascular examination – important if considering causes of loss of consciousness or a thromboembolic source of stroke
Abdominal examination – important if considering metabolic diseases (e.g. hepatomegaly in glycogen storage disorders)
Further investigations
Record a full set of vitalsigns
Plot the height and weight on a growthchart
Blood tests – FBC, U&Es, CRP, Autoantibodies
Lumbar puncture (e.g. meningitis, encephalitis)
Neuroimaging (CT/MRI)
EEG (seizures)
Nerve conduction studies
Reviewer
Dr Sunil Bhopal
Senior Paediatric Registrar
References
Acedillo, R (2011). Pediatric Neurological Exam Checklist. Learnpediatrics.com Narration. The University of British Columbia. [LINK](Accessed 20 Mar 2019)
Bishop & Statham (2011). Neurology Examination. Learnpediatrics.com Narration. The University of British Columbia. [LINK](Accessed 20 Mar 2019)
Hills, W. Pediatric and Infant Neurologic Examination. OHSU. [LINK] (Accessed 20 Mar 2019)
Kotagal (2019). Detailed neurologic assessment of infants and children. Nordli Jr. (ed). UpToDate. Waltham MA. [LINK](Accessed 20 Mar 2019).
Lissauer, T., Clayden, G., & Craft, A. (2012). Illustrated textbook of paediatrics. Edinburgh: Mosby.
Miin Lee (2014). Neurological Examination Guide. MRCPCH Clinical Revision. Trainees Committee, London School of Paediatrics. [LINK](Accessed 20 Mar 2019)
Snowdon, D (2006). Neurological examination.
Tasker, R. C., McClure, R. J. & Acerini, C. L. (2013). Oxford handbook of paediatrics. Oxford: Oxford University Press.
Assessing growth is a key component of the paediatric exam. The measurement of height, length, weight and head circumference appears deceptively simple but requires accuracy, adaptability of method and patience to ensure it is done correctly.
With all children, don’t expect to follow a pre-defined order. Be creative and playful, making the examination into a game involving parents, siblings and the toys available to you.
The traditional ‘growth chart’ 1
Introduction
Wash your hands
Introduce yourself to both the parents and the child.
Explain what the growth assessment will involve and explain why the measurement is required.
Gain consent from the parents/carers and/or child before proceeding.
Today I’d like to measure your child’s height (or length), weight and head circumference, which will involve the use of scales, a standing ruler (or measuring board – as appropriate) and a tape measure.
Are you happy for me to carry out the examination?
Length/Height Measurement
Measuring standing height using a stadiometer. 2
Children less than 2 years old should be measured supine (lying down, facing upwards).
Children unable to stand, or who find standing difficult, due to illness/physical disability should also be measured supine.
If the child is known to have one leg shorter than the other, they should be measured standing on the longest leg. They should always be measured on the same leg.
The following should be removed:
Shoes
Hair clips and braids (undo braids)
Orthopaedic braces
Supine Length
Preparation
Two people are generally required to measure a child when supine.
Play and distraction techniques may be useful to keep the child comfortable and entertained during what can be a distressing moment of measurement.
An appropriate measuring board/Rollametre should be placed on a firm and flat surface.
Measurement of supine length
Lay the child on the board.
One person should ensure the head is supported (in contact with the headboard) and is in the correct position (the corner of the eyes horizontal to the middle of the ear – looking straight up at the ceiling). This is a great job for the parent/carer, helping to also minimise distress for the child being held in this position.
The other person should position the child:
Feet together
Heels touching the backplate of the measuring instrument
Legs straight and in alignment with the body
Buttocks against the backboard
Scapula against the backboard if possible
The ankles should be supported, and this position maintained
Record the measurement to the last complete millimetre.Don’t round up or down.
The positioning of the child/young person is crucial for the accurate measurement of height.
It is often helpful to involve the parent/carer in the measurement of the child to aid in positioning.
An appropriate stadiometer (standing ruler) should be used, with an accompanying 500-gram beanbag to weight the headboard.
Measuring standing height
The measurer should be performed at a level that is eye to eye with the child.
The child should be positioned with:
Their feet together and flat on the ground
Heelstouching the backplate of the measuring instrument
Legs straight
Buttocks and scapula against the backboard
Arms loosely by their side
The child’s head should be positioned with the corners of their eyes horizontal to the middle of the ear, looking straight ahead.
The weighted headboard should be placed carefully on the child’s head.
Hold the child’s mastoid processes to ensure they are in the correct position.
Ask the child to take a ‘big breath in’ and maintain pressure on the mastoids.
Ask the child to ‘breath out normally’ and exert upward pressure on their mastoid processes. Ensure their feet and heels remain on the ground. Don’t lift or overextend the child.
Once the child has fully exhaled, record the measurement to the last complete millimetre. Read at eye level. Don’t round up or down.
NB. Sitting height or Crown-rump length may also be required in some children. See the ‘Further reading’ section below for appropriate measurement guides.
A child is weighed naked up to 2 years old. Appropriate baby scales should be used.
Ensure the nappy is removed.
After 2 years of age, light clothesonly should be worn. Shoes or slippers should be removed and pockets emptied of their contents.
Appropriate sitting or stand on scales should be used.
If the child is weighed with additional equipment (i.e. splint/cast, medical equipment or dressing), this should be documented.
Measurement
As with height/length, it is often easier if two people are involved in the process of weighing a child. This may include the parent/carer if they are willing to assist.
Again, play and distraction techniques may be useful throughout the measurement of weight.
If appropriate, ask the parent/carer to place the child on suitable scales. The child must be placed completely on the scales and their weight fully borne.
For a distressed child, the carer can be asked to stand on the standing scales, the scales then zeroed with the carer still standing on them, and the child handed to the parent. The scale should then show the child’s weight.
Alternatively, the child can be measured with the carer on sitting scales. The weight of the carer with the child should be measured, then the carer’s weight subtracted.
Record the figure on the scale to the last complete gram for neonates or children <4kg and to the last 100g for older children or if >4kg. Do not round the measurement up or down.
The child should then be redressed and left comfortable.
A Lasso-o is the recommended equipment used to measure head circumference as per RCPCH guidelines.
The child’s hairstyle should allow for accurate measurement – i.e. remove plaits or braids and remove any hair adornments. If these are not removed – this must be documented.
Measurement
Preparation
Again, play and distraction techniques may be useful throughout the measurement process.
Before using the measuring tape:
Consider the general clinical condition (e.g. is the child irritable or vomiting)
Observe the state of the fontanelle (open, closed, full, tense, soft or dipped)
Note the shape of the child’s head (i.e. craniosynostosis, or a low hairline, e.g. Saethre-Chotzen syndrome).
Measurement of head circumference
Loop the Lasso-o and place over the child’s head.
The tape should be placed above the ears and midway between the eyebrows and the hairline, to the occipital prominence at the back of the head (the aim is to measure the largest circumference possible).
Pull the Lasso-o or measuring tape taut so that any hair is compressed.
Read the measurement from the appropriately marked place. This should be taken to the nearest millimetre.
Repeat the procedure above to ensure the accuracy of the measurement.
Note 1: If the child does have an abnormally shaped head, the tape should be placed over the largest measurable circumference. This should be documented against the recorded measurement.
Note 2: A separate head circumference chart is available for children with achondroplasia and trisomy 21.
Southern, L (2017). Height: measuring a child/young person. Clinical Guidelines – Great Ormond Street Hospital for Children NHS Foundation Trust. Accessed 28 March 2019. [LINK]
Southern, L (2017). Weight: measuring a child/young person. Clinical Guidelines – Great Ormond Street Hospital for Children NHS Foundation Trust. Accessed 28 March 2019. [LINK]
May, L (2017). Head circumference: measuring a child. Clinical Guidelines – Great Ormond Street Hospital for Children NHS Foundation Trust. Accessed 28 March 2019. [LINK]
Growth charts are an important tool used to compare the growth of an individual to the growth of a normal population (the reference population). Thus, they may be used to define the abnormal growth of a child and track their progress through time.
The current UK-WHO growth charts combine World Health Organisation standards with UK preterm and birth data to depict a healthy pattern of growth that is desirable for all children, whether breastfed or formula-fed and of whatever ethnic origin.
The growth chart used to plot the measurements of weight, height/length and head circumference should correspond to the child’s sex and age. See the Paediatric Growth Assessment guide for instructions on taking these measurements.
RCPCH Growth Charts
Copies of the NHS & RCPCH approved growth charts are available online:
For babies born at term (>/= 37 weeks), plot each measurement on the relevant chart by drawing a small dot where a vertical line through the child’s age crosses a horizontal line through the measured value – height/length, weight or head circumference (see Fig. 1 below).
Plot birth weight/length/head circumference at age 0.
For pre-term infants
If <32 weeks gestation – the NICM chart should be used.
If >32 weeks and before 37 weeks, plot all measurements in the preterm section until 42 weeks gestation. Then plot on the 0-1-year chart using gestational correction as shown in Fig. 2 (below).
Gestational correction: Plot measurements at the child’s actual age, then draw a line back the number of weeks the infant was preterm. Mark the spot with an arrow: this is child’s gestationally corrected centile. This should continue until at least 1 year of age.
2-18 Years
Plot each measurement on the relevant chart by drawing a small dot where a vertical line through the child’s age crosses a horizontal line through the measured value – height or weight (see Fig. 1 below).
Figure 1 – Plotting example
Centile terminology
If the point is within 1/4 of a space of the line, they are on the centile (i.e. 91st).
If not, they should be described as being between the two centiles (i.e. 75th-91st).
A centile space may be considered the equivalent distance if midway between centiles.
A centile space may also be considered the distance between two of the centile lines.
Plotting for PRE-TERM INFANTS: Draw a line back the number of weeks preterm and mark with an arrow (Dot = actual age / Arrow = gestational age).
Figure 2 – Centile terminology (the key is above)
Percentiles
Growth charts indicate:
A child’s size compared with children of the same age and maturity who have shown optimal growth.
How quickly a child is growing.
Centile lines show the expected range of weights and heights (or lengths). They describe the number of children expected to be BELOW that line (i.e. 50% below the 50th, 91% below the 91st):
99 out of 100 children who are growing optimally will be between the two outer lines (0.4th – 99.6th centiles).
Half will lie between the 25th and 75th centile lines.
Babies do not all grow at the same rate – so a baby’s weight often does not follow a particular centile line. Most likely, the weight will track within one centile space (Fig. 1). Acute illness can lead to sudden weight loss and a weight centile fall, but children generally recover to their normal centile within 2-3 weeks.
A sustained drop throughtwo or more weight centiles is unusual and should be investigated.
Healthy children generally show a stable average height/length position over time.
After 6 weeks of age, a head circumference below the 2nd centile will be seen in only 1 in 250 children and should be investigated. Furthermore, a head circumference above the 99.6th centile, or crossing upwards through 2 centile spaces should only be cause for concern if there is continued rise after 6 months, or other signs and symptoms (i.e. irritability, vomiting, full or bulging fontanelle, persistent downwards gaze).
Between 2-18 years – Further assessment is required with any of the following:
Weight or height or BMI is below the 0.4th centile (unless already fully investigated at an earlier age).
The height centile is more than 3 centile spaces below the mid-parental centile (see below).
A drop in the height centile position of more than 2 centile spaces.
The Mid-Parental Centile is the average adult height centile to be expected for all children of these particular parents.
The scale is located on the right-hand side of the chart (Fig. 3).
If possible, measure both the parent’s heights. If not available, use reported heights.
Mark their heights on the relevant Mother and Father scales.
Join the two points with a line between them. The mid parental centile is where this line crosses the centile line in the middle.
Compare the mid-parental centile to the child’s current height centile.
This may help assess whether the child’s growth is proceeding as expected.
If a large discrepancy exists between the mid-parental centile to the child’s current height centile, the more likely it is that the child has some sort of growth disorder.
9 out of 10 children’s height centiles are within +/- 2 centile spaces of the mid-parental centile.
Figure 3: Mid-parental centile chart example
Adult Height Predictor Chart
The Adult Height Predictor chart (Fig. 4) allows for a prediction of the child’s adult height based on their current height (adjusted to allow for very tall and short children to be less extreme as adults).
Plot the most recent height centile on the centre line and read off the predicted adult height for this centile.
80% of children will be within +/- 6cm of this value as adults
Figure 4: Adult Height Predictor Chart example
Pubertal Assessment
The 2-18 years growth chart contains puberty lines from age 8 to 18 years old for girls and 9 to 18 years old for boys.
These lines indicate the normal age limits for the phases of puberty.
Girls
Pre-puberty
Tanner Stage 1
In puberty
Tanner Stage 2 & 3
Completing puberty
Tanner Stages 4 & 5
No signs of pubertal development.
Any breast enlargement, pubic or armpit hair.
Started periods with signs of pubertal development.
Interpretation
Puberty before 8 years old in girls is likely to be precocious and further investigation is necessary.
If a patient is between 8-13 years old and is plotting within the shaded area of the chart for their height centile, pubertal assessment is required, and mid-parental centile should be assessed.
If they are “In puberty” or “Completing puberty” – they are BELOW the 0.4th centile and should be referred for further investigation.
If “Pre-pubertal”, they are generally growing normally but should be compared to their mid-parental centile.
If there are no signs of puberty by 13 years of age, then puberty is delayed and further assessment is indicated.
If the patient is older than 16 years old and not in the “completing puberty stage”, maturation is delayed, and further investigation is required.
Boys
Pre-puberty
Tanner Stage 1
In Puberty
Tanner Stage 2 & 3
Completing puberty
Tanner Stages 4 & 5
If both of the following:
High voice &
No signs of pubertal development
If any of the following:
Slight deepening of the voice
Early pubic or armpit hair growth
Enlargement of testes or penis
If any of the following:
Voice fully broken
Moustache & early facial hair growth
Adult size of penis with pubic and axillary hair
Interpretation
Puberty before the age of 9 years in boys is likely to be precocious and further investigation is necessary.
If a patient is between 9-14 years old and is plotting within the shaded area of the chart for their height centile, pubertal assessment is required and mid-parental centile should be assessed.
If they are “In puberty” or “Completing puberty” – they are BELOW the 0.4th centile and should be referred for further investigation.
If “Pre-pubertal”, they should be referred for further investigation and compared to their mid-parental centile. After investigation, these children are often found to be growing normally.
If there are no signs of puberty by 14 years of age, then puberty is delayed and further assessment is indicated.
If the patient is older than 17 years old and not in the “completing puberty stage”, maturation is delayed, and further investigation is required.
BMI Centiles
The growth charts also provide an opportunity to calculate the child’s BMI from the age of 2.
Both 0-4 Years (Boys & Girls) and 2-18 Years (Boys & Girls) charts provide a simple graph to convert the child’s weight centile and height centile to their BMI centile.
Interpretation
A child whose weight is average for their height will have a BMI between the 25th and 75th centiles, whatever their height centile.
BMI above the 91st centile suggests the child is overweight.
BMI above the 98th centile is very overweight(clinically obese).
BMI below the 2nd centile is unusual and may reflect undernutrition requiring further investigation. In older children, this may simply reflect a small build.
Growth Charts for Children with Down Syndrome
The Down Syndrome Medical Interest Group (DSMIG) & RCPCH have developed cross-sectional growth charts for boys and girls with Down Syndrome for use from term to 18 years old.
Reasons for their use include:
Short stature is a recognised characteristic of most people with Down Syndrome – the average height at most ages is around the 2nd centile for the general population.
These children are at increased risk of additional medical conditions that may interfere with growth (e.g. congenital cardiac disease, sleep-related upper airway obstruction, Coeliac disease, feeding issues and thyroid hormone deficiency).
Regular measurements in combination with a general health assessment, nutritional and thyroid status are likely to be sensitive initial indicators of such medical problems, allowing for early intervention.
Reviewer
Dr Sunil Bhopal
Senior Paediatric Registrar
References & Further Reading
COI (2009). Using the new UK–World Health Organization 0–4 years growth charts. Department of Health. Accessed 29 Mar 2019. [LINK]
Health Policy team (2012). UK Growth chart 0-4 years. RCPCH. Accessed 28 Mar 2019. [LINK]
Health Policy team (2012). UK Growth chart 2-18 years. RCPCH. Accessed 28 Mar 2019. [LINK]
RCPCH/DSMIG Down syndrome growth chart steering group (2012). The 2011 DSMIG/RCPCH growth charts for children with Down syndrome – Fact sheet. DSMIG. Accessed 28 Mar 2019. [LINK]
All UK doctors begin work in a hospital environment and become familiar with writing prescriptions on an inpatient Prescription and Administration Record or “Kardex”. However, most prescriptions are issued to patients in a primary care setting and there are some important differences to consider.
Prescription Forms
Prescriptions written for NHS patients in primary care are done so on set prescription forms – either as part of a handwritten prescription pad or prescription forms which can be printed on using GP practice computer software. The legal prescription requirements are the same across these forms, but it is important to understand the differences so the correct one is used. The below tables provide an overview of key form colours in each major UK region.
Table 1. Prescribing forms in England
All prescription forms originating in England begin with the code FP10.
Code
Form Colour
Issued by
Notes
FP10
FP10NC
FP10SS
FP10HNC
GREEN
GPs
Nurse Prescribers
Pharmacist Prescribers
Hospital Doctors (Outpatient)
The suffix of the code gives an indication as to the prescriber (e.g. HNC for hospital)
FP10MDA
BLUE
Prescribers managing substance misuse patients
Instalment dispensing prescriptions for the purpose of treating addiction.
FP10SP
FP10PN
LILAC
Community/Independent Nurse Prescribers
FP10D
YELLOW
Dentists
Table 2. Prescribing forms in Wales
Code
Form Colour
Issued by
Notes
WP10
WP10SS
WP10SP
WP10HP
WP10HSP
GREEN
GPs, hospitals and supplementary prescribers
The suffix of the code gives an indication as to the prescriber (e.g. HP for hospital)
WP10MDA
WP10HP(AD)
GREEN
Prescribers managing substance misuse patients
Instalment dispensing prescriptions for the purpose of treating addiction.
WP10CN
WP10PN
GREEN
Community/Independent Nurse Prescribers
WP10D
GREEN
Dentists
Table 3. Prescribing forms in Scotland
Code
Form Colour
Issued by
Notes
GP10
GP10(SS)
PEACH
GPs
HBP(A)
PINK
Prescribers managing substance misuse patients
Instalment dispensing prescriptions for the purpose of treating addiction.
GP10(N)
LILAC
Nurse Prescribers
HBP
BLUE
Hospital-Based Prescribers
GP14
YELLOW
Dentists
Table 4. Prescribing forms in Northern Ireland
Code
Form Colour
Issued by
Notes
HS21
HS21CS
SHADED GREENANDPINK
GPs
HS21X
HS21XCS
SHADED GREENANDPINK
Non-Medical Prescribers
HS21N
HS21NCS
SHADED GREENANDPINK
Community Nurses
HS21D
YELLOW
Dentists
Sources of Information
Before you put pen to one of these forms it is important you have all the right information to hand so that your prescription is safe and correct.
Local Formulary
A good place to start is the local formulary for your NHS Board/Trust. These give information on which drugs to prescribe per class/indication, usually based on clinical guidelines (such as NICE/SIGN) and cost. For example, if you have an adult patient with asthma and wish to prescribe an inhaled corticosteroid, your local formulary will indicate which to consider the first line. In this fictional example, this would be Clenil Modulite 100 micrograms inhaler as this is the most cost-effective option.
Figure 1. Sample Asthma Guideline adapted from SIGN/BTS
British National Formulary (BNF)
The BNF is the go-to resource for drugs information in the UK. It is available as a printed book, mobile app or online. The BNF is organised into 16 main chapters which are subdivided by condition, the drugs are then organised under the conditions by class. Be sure to check both the condition summary, class monograph and drugs monograph as important information for your drug may be included in the class monograph and not repeated for each individual drug.
Figure 2. Copy of a BNF from 2017
Summary of Product Characteristics
Each licensed medicine in the UK has a “Summary of Product Characteristics” available on medicines.org.uk. These contain more detailed information beyond what is contained in the BNF and are a useful source of further information if your query is not answered by the BNF.
Pharmacists and Medicines Information Services
Pharmacists are experts in the use of medicines and are an excellent source of advice if you are not sure about something. Many GP practices employ pharmacists in house, otherwise, those working in community pharmacy may also be able to help you. For more specialist advice there are Medicines Information Services around the UK whose contact details are located within the BNF.
Patient-Specific Factors
Before you go ahead and prescribe your drug of choice, it is important to consider the specific patient in front of you. The headlines below can be used as a checklist when prescribing to make sure you have considered them when deciding if your prescription is appropriate.
Table 5. Prescribing in Specific Patient Groups
Age
Children and elderly patients are at higher risk of prescribing complications, so take special care.
Weight
Do you have the patient’s current weight for dose calculation?
Renal Impairment
Will the excretion of this drug be affected?
Can this drug worsen renal impairment?
Hepatic Impairment
Will the metabolism of this drug be affected?
Pregnancy and Breastfeeding
Is this drug known to be safe?
What are the benefits vs risks?
Other Drugs/Conditions
Are there interactions?
Will this drug worsen another condition (check contraindications and cautions in BNF)
Prescription Requirements
All prescriptions, regardless of if they are written on a hospital chart, primary care prescription form or as a private prescription have the same basic requirements.
All prescriptions must:
State the name and address of the patient
Be written or printed legibly in ink
Be signed in indelible ink
Have an appropriate date (usually the date of signing)
State the address of the prescriber
State the age of a child under 12
It is good practice to:
Include the age and date of birth of the patient
State the weight of the patient where it has been used for a dose calculation
Details of the medicine to include:
Name of medicine (generic name unless a specific brand must be given)
Form (e.g. tablets, oral suspension)
Strength (e.g. 5mg for tablets or 125mg/5ml for an oral suspension)
Units and acceptable abbreviations are shown in Table 6.
Table 6. Common drug units and associated abbreviations
Unit
Abbreviation
Grams
g
Milligrams
mg
Micrograms
Must be written in full (micrograms)
Nanograms
Must be written in full (nanograms)
Litres
L
Millilitres
mL
International units
Units (not iu or u)
Directions
Should include quantity and frequency
For liquid preparations, it is best practice to write directions using the mass of active ingredient rather than volume so the pharmacist is clear on the dosage (especially for oral suspensions i.e. 125mg rather than 5ml).
Quantity to be supplied (e.g. 56 tablets)
Figure 3. Exemplar FP10 Prescription
Legal Classifications and Controlled Drugs
Medicines licensed for use in the UK can be broken down into four basic categories.
General Sales List (GSL)
Those medicines which can be purchased from any shop, for example, a petrol station, such as paracetamol.
Pharmacy Only (P)
Medicines which may only be sold in a pharmacy by a pharmacist or their supervised staff.
Prescription Only Medicines (POM)
Medicines which are only available with a valid prescription.
Controlled Drug
Prescription-only medicines which are subject to extra prescription requirements.
Prescribing restrictions
Most drugs that are GSL, P or POM may be prescribed as described above (however some health boards/trusts are restricting prescribing of GSL and P medicines to encourage patients to buy these themselves). Controlled drugs are subject to extra prescription requirements which are covered in the Controlled Drug Prescribing article. You can find out which category a drug falls into in the BNF.
Sample Problems
For all of these problems, today’s date is 17/12/2018.
Case 1
Mr Sebastian Whyte 25/05/1960 of 23 Union Street, Woodland Town is a 58-year-old male who has been recently diagnosed with essential hypertension and has no past medical history. You decide to prescribe an antihypertensive and the first-line drug in your area is Amlodipine. Please write a prescription using a blank FP10 prescription form and then compare against the example below.
This question requires you to check the starting dose in the BNF and write a legally valid prescription. (NB Age and duration of treatment are not legally required)
Case 2
Miss Laura Brown 04/06/1995 of Flat D 22 University Road, Woodland Town WD12 1MN presents with an itchy left eye with yellow discharge that stuck her eye closed this morning. She denies pain and does not use contact lenses.
Bacterial conjunctivitis
Please write a prescription for an appropriate eye drop to treat this problem using a blank FP10 prescription form and then compare against the example below.
This question requires you to check the recommended treatment for bacterial conjunctivitis in the BNF and write a legally valid prescription. It is helpful to look at the available pack sizes in the BNF to choose an appropriate quantity to prescribe. If you do not specify a quantity the pharmacist will issue the smallest pack available.
Other acceptable directions include:
Apply ONE drop to the LEFT eye at least every TWO hours then reduce the frequency as an infection is controlled and continue for 48 hours after healing.
Apply ONE drop to the LEFT eye every TWO hours for the first two days and then four hourly for three days.
Case 3
Master Alex Johnson 12/09/2011 of Home Farm, Woodland Town WD10 1FA has been seen by the Child and Adolescent Psychiatry Team who have diagnosed him with ADHD. You are to issue a prescription for his Concerta XL under shared care arrangements. He is currently taking 18mg in the morning. Please write a prescription using a blank FP10 prescription form and then compare against the example below.
This question is a test of controlled drug prescribing – have a look at the controlled drug prescribing guide for more information. It is best practice to issue a maximum of thirty days supply at a time for CD medicines. As this is a prescription for a child under 12, the age should be entered in the age box.
References
Datapharm Communications Ltd. About the eMC. Published in 2019. [LINK]
Joint Formulary Committee. British National Formulary. Published in 2020. [LINK]
Pharmaceutical Services Negotiating Committee Is this prescription form valid? Published in 2018. [LINK]
Royal Pharmaceutical Society of Great Britain. Medicines, Ethics and Practice: The professional guide for pharmacists. Published in 2014. [LINK]
Sputum sample collection is a procedure designed to collect expectorated secretions from a patient’s lower respiratory tract. It is normally used as a laboratory specimen for the isolation of micro-organisms that might be causing infections of the respiratory tract. A first specimen obtained in the early morning before eating or drinking provides the best sputum sample. Chest physiotherapy may be helpful in mobilizing secretions just prior to sputum collection in some patients (i.e. patients with cystic fibrosis).
NICE CG 191 recommends microbiology tests, sputum collection and blood cultures (See Geeky Medics Blood Culture guide here) in all patients with moderate and high risk: CURB-65 2 or 3 (CURB-65 calculator can be found here), and in all patients with suspected tuberculosis.
Contraindications
This procedure causes severe coughing. Therefore it should not be performed in patients whom severe coughing may be harmful. This may include patients with the following conditions:
Haemoptysis of unknown origin
Acute respiratory distress
Unstable cardiovascular status (arrhythmias, angina, acute coronary syndrome)
Thoracic, abdominal or cerebral aneurysms
Recent thoracic, abdominal or eye surgery
Pneumothorax, pulmonary embolism
Fractured ribs or other thoracic trauma
Hypoxia (oxygen saturation <90% on room air)
Lung function impairment (FEV1 < 1.0 litre)
Gather Equipment
In order to obtain a sputum sample you will need to gather the following equipment:
Sputum specimen container and label
Biohazard bag for delivery of specimen to the laboratory
Tissue paper for the patient following cough
Investigation request form
Appropriate personal protective equipment (PPE)
Clean gloves and apron
If the patient is likely to have tuberculosis or other high-risk infection such as influenza or legionella then you will also need mask, gown and goggles.
Preparation
Identify the patient as per your institution’s internal protocol. Verify their surname, forename and date of birth (DOB) and check their wrist-band, if present.
Place the patient in a comfortable, upright seated position
Collecting the Sputum Sample
Introduce yourself and your role
Check patient details (name, DOB) – confirm with details on patient wristband if applicable.
Explain the procedure. An example could be: “Hello Mr Gibson, my name is Dr Smith, we need to collect a sample from your lungs to be able to identify which bug is causing this infection in your chest. The procedure includes breathing in and out, coughing and collecting sputum in this pot. It might cause you to cough heavily straight after, but shouldn’t be too uncomfortable.”
Check the patient’s understanding of the procedure. “Do you understand everything I’ve explained? Do you have any questions?”
Obtain consent. “Are you happy for me to perform the procedure?”
Wash your hands
Have the patient rinse their mouth before coughing to remove any oral contaminants, which will be present in the patient’s saliva.
Instruct the patient to breathe in and out deeply 2 or 4 times. Then instruct them to give a series of low, deep coughs to raise sputum from the lungs. “Deep breathe in and out. Keep breathing out until you empty your lungs completely. This should trigger a deep cough and hopefully, some sputum will dislodge and come up to your mouth.”
Collect 1-2 teaspoons of sputum in the container; close and seal lid.
Sample of Sputum Pot
Follow the manufacturer’s instructions to complete the closing system.
Label the specimen container by the patient.
Complete the request form and place in a biohazard transport bag as per local policies. Ensure you report the relevant clinical history, including relevant past medical history on your request form.
Evaluate the patient’s status after the procedure, identifying red flags such as difficulty breathing or a drop in oxygen saturation.
Remove your PPE and wash your hands
Thank the patient
*Deliver sputum sample to the laboratory as soon as possible for appropriate microbiology investigations such as culture, microscopy and antibiotic sensitivity tests or molecular tests for viral infections.
Special Circumstances
If your patient has a tracheostomy or is intubated and ventilated, the procedure varies and you might need to use a suctioning device such as a suction trap. If the patient finds it difficult to expectorate, a 0.9% sodium chloride nebuliser might help loosen secretions.
References
Smith SF, Duell DJ, Martin BC. Clinical nursing skills. Published in 2011. [LINK]
Blakeborough L, Watson JS. The importance of obtaining a sputum sample and how it can aid diagnosis and treatment. British Journal of Nursing. Published in 2019. [LINK]
New South Wales (NSW) health. Sputum induction guidelines – Tuberculosis. Published in 2018. [LINK]
Shepherd E. Specimen collection 4: procedure for obtaining a sputum specimen. Published in 2020. [LINK]
Eccles S, Pincus C, Higgins B, Woodhead M. Diagnosis and management of community and hospital-acquired pneumonia in adults: summary of NICE guidance. Published in 2014. [LINK]

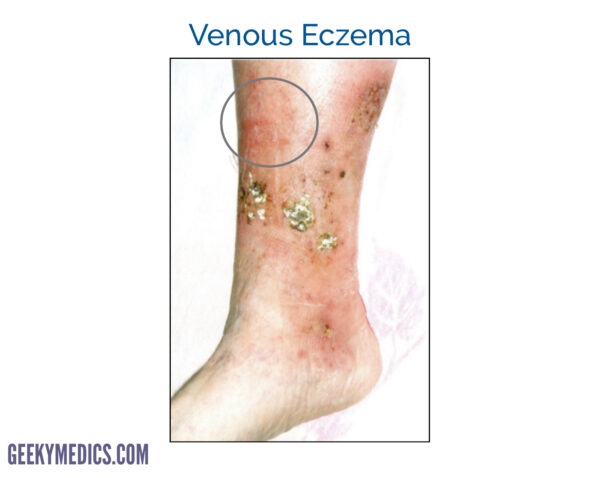
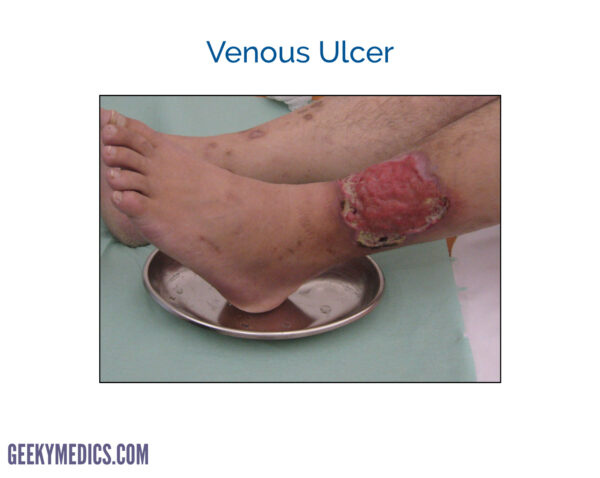


")


")


")


 is the recommended equipment used to measure head circumference as per RCPCH guidelines.


